ESTABLISHED 2010 - Beyond The Campfire was created to encourage readers to explore the great outdoors and to observe it close up. Get out and take a hike, go fishing or canoeing, or simply stretch out on a blanket under a summer sky...and take your camera along. We'll talk about combining outdoor activities with photography. We'll look at everything from improving your understanding of the basics of photography to more advanced techniques including things like how to see photographically and capturing the light. We'll explore the night sky, location shoots, using off camera speedlights along with nature and landscape. Grab your camera...strap on your hiking boots...and join me. I think you will enjoy the adventure.

Friday, June 23, 2017

Depth of Field - How I use It

Simply stated, Depth of Field (DOF) is that portion of a photograph that remains in focus both in front of and behind where your focal point is made. If I focus on a particular object, depending on the focal length of the lens, the aperture, and where I focus, a certain portion of the image may or may not remain in focus. The longer the focal length of the lens, something like 200mm or 400mm or larger, the relative depth of field becomes narrower for a given aperture. The larger the aperture, say f/2.8 or f/3.5...or even f/6.3 as opposed to a small aperture like f/16 or f/22, the narrower the Depth of Field becomes.

Here are two examples. The first image is general scenic shot that required a short focal length lens 18mm along with a small aperture f/22. By doing so, virtually the entire image remains in focus from almost directly in front of the lens to all the back to the sky. This is an effective technique to use for most scenic shots.


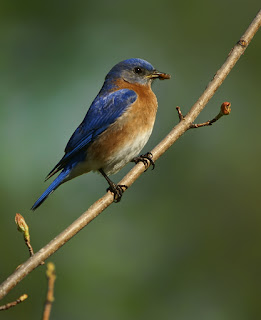
This next image is a subject specific shot where I used a long focal length lens, 500mm, along with a relatively middle to large size aperture, f/6.3. The idea on this one was to isolate the blue bird against a blurred background. The 500mm lens does by itself shorten the DOF which in turn creates a blurred background, but when combined with a larger aperture the effect can become quite dramatic.


What is important here is understanding how to use Depth of Field effectively in a photograph. So let's discuss how I use it and what I look for.

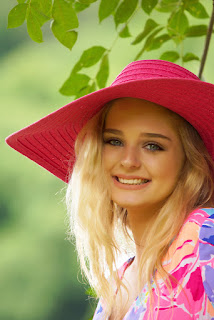
I use a tight DOF and a wide DOF for all kinds of shots including both scenic and subject specific shots. Subject specific shots are those shots where you want to isolate your subject and emphasis its characteristics without interference from visual background noise. Portrait closeups are good examples on when to use this technique, like the image shown here.


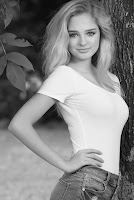
I most often use this approach when the background is generic in nature and can be used primarily as a simple natural backdrop. When blurred, the background now becomes something that enhances the image as opposed to competeing with it. However, there are times I want to include the background as part of the portrait. This is most often applied when the background provides a Measure of Place for the portrait, like this next image which was shot as f/10 at 50mm. As you can see, the entire image remains in focus with the pillars providing a dramatic flavor to the image.


Keeping with that idea, scenic shots can be quite effective when created using a tight DOF. Shots like these are approached much the same way as closeup portraits. Hre, I wanted to isolate this branch of fall leaves against the golden brown of the background. By doing so, the background blurred as it is contributes to the color flavor of the image without interfereing with the main subject.


The point is...always be aware of your surroundings, especially what is in the background and plan your shots according to the type of DOF that will create the most appealing effect. It is a realtively simple concept that more often than not is not always properly used. By understanding how your camera / lens combination works in regards to DOF, you can use this technique to generate some amazing photographs.
Sunday, June 11, 2017

A Day in The Field

Early June sometimes finds itself struggling to decide where it wants to go. It seems to know the dog days of summer are but a week or two away, yet somehow probably in defiance of the inevitable, the first week of June seems to always cling to the last remnants of spring. That is the way it was leading up to and then falling on a single June day afternoon recently. For six months we had tried to schedule a location shoot but available time and circumstance prevented us from connecting...that is until that day.


Leading up to our shoot the previous few days rain fell and the tempertures dropped lower than are typical for this time of year around these parts. Then the days turned almost perfect when highs in the mid 70's along with a light breeze. Clouds rolled in and created a covering blanket of soft white, which for a photographer is mostly perfect as the sky then becomes a giant softbox casting gently smooth light. Our day was set and the shoot was on...location was Romanza Johnson Park where Trammel Creek winds its way around the edges.


I showed up a little early to set up the changing tent and the speedlight stands...checked and rechecked the settings and the camera remote; Group A channel 1, Group B channel 1...yes, the power settings changed on queue for each. The softbox was attached to Group A light and Group B was powered down to about 1/32nd power...just enough to provide a subtle highlight. Group A is always my main light, and Group B is usually my main highlighter. Sometimes I'll use up to four lights adding a Group C and D all fired as Channel 1, but this day only two lights proved necessary and as it turned out, they worked exactly the way I planned.

My model was a delightful young lady, Sophie, who arrived shortly there after with her mom. After a quick intro as to what we were wanting to accomplish, we decided to setup along the split rail fence that stretched along the entrance road on the outer edge of the park. Because of the rain, the ground was too muddy elsewhere and the creek was running higher than normal preventing us from using the gravel bar.

The first few shots I made were simply establishing shots to verify exposure and light angles. Turns out a few of those were pretty good shots and became part of the image grouping. As always my desire was to have the model simply be herself, yet add a hint of sassy along with a dash perky. Some models are more difficult to work with, but some, like Sophie, took to it like a pro. I never overdo instructions, choosing to drop hints and suggestions and then let the model fill in the gaps with her own style and personality. Sometimes it is necessary to encourage a bit more animation from them and then offer a range of opportunity for them to give it a try.


I almost always use a long lens as this allows for a wider range of depth of field control plus it reduces any uncomfortable personal space intrutions that might occur using a shorter focal length lens. Some of the most effective shots are done when you simply allow the model to slowly move across a few yards without posing, without becoming too static. A flip of the hair, a subtle look down, a slight tilt of the head, gentle smile...allow the natural light to work the background, but allow the model to become herself without being overly concerned about her actions. Just allow the off camera flash to fill in the rest of the light.

The key...the eyes. They must be clear, bright, and sharp with strong color definition. Always focus on the eyes, not always an easy compositional task when your model is moving toward you. The trick is to take a lot of shots so you will almost always have a few come out the way you want them to.

Most of my shoots last about an hour and half...move out much past two hours and everyone starts getting tired with a noticable drop off in energy.

Every photographer develops their own style and I haved gained a great deal of insight from many of my photographer friends. Some tend to slant toward more of an edgy look, others are very creative and stylish, still others are plain and ordinary. Over time my style has grown into a simple homey look accented with a slight amount of sass and sweetness. Mostly I just let the model be themselves as much as possible and encourage them to loosen up enough to feel comfortable with what we are doing.

All in all this early June outing turned out to be a delightful day in the field...and the results...well, I think they turned out rather well.