ESTABLISHED 2010 - Beyond The Campfire was created to encourage readers to explore the great outdoors and to observe it close up. Get out and take a hike, go fishing or canoeing, or simply stretch out on a blanket under a summer sky...and take your camera along. We'll talk about combining outdoor activities with photography. We'll look at everything from improving your understanding of the basics of photography to more advanced techniques including things like how to see photographically and capturing the light. We'll explore the night sky, location shoots, using off camera speedlights along with nature and landscape. Grab your camera...strap on your hiking boots...and join me. I think you will enjoy the adventure.

Friday, April 27, 2018

Shooting on Location: A Process of Evaluation

Shooting on Location has its rewards and drawbacks. The drawbacks tend to multiply themselves when things do not go right. The rewards, however, far outweigh the drawbacks and are worth every headache you might encounter along the way. Location shoots offer opportunities not easily duplicated in a studio and the fun part of shooting on location is being able to build the shot to fit your concept. Throw in a portrait opportunity and the requirements change even more. But, building the shot requires a great deal more evaluation and effort than simply showing up and shooting at random with whatever light is available.


Shooting on location requires an element of evaluation; to do so effectively you must identify what is important, what to leave out or avoid, the direction and quality of the light, where the shadows are, where the hot spots are, what is in the background, and most importantly, what to accomplish here. Many novice photographers see the big picture and snap away without seriously contemplating what the potential of the location offers. Instead, take some time to think through the photographic problem and evaluate what the potential is.

I will often just sit and enjoy the moment if I am alone in a new outdoor location. Often this will slow down time and potential things to photograph begin to reveal themselves. Remember too, evaluation of a location means to think beyond what you are currently seeing and think in terms of what might be if you return to this same spot later in the day, or early before sunrise, or even a different season.


Some locations are simply filled with clutter often making it difficult to weed through and line up your shot(s) in such a way as to avoid including things that detract from your image story. When working in a cluttered location try to narrow the scope of your shot by focusing in on a smaller portion. Many times, this condensed portion will tell the larger story from a smaller perspective, and that in most cases is all you need to do. Oddly enough, the clutter itself can become your story, so keep an open mind about what you are shooting.

Some locations are just very bland in nature not presenting much in the way of an interesting story. When faced with this kind of dilemma you may need to shake up your composition by changing the angle from which you are shooting. Get down low, all the way if necessary, and include something small as part of your foreground. Also, c limb higher if you can, maybe even stand on top of your vehicle, a fence or wall, or simply raise your tripod as high as it will go, anything to change the perspective of your shot. This will often shift your view enough to allow the bland nature of the location to take on an entirely new and exciting look.


One location I have always enjoyed shooting when I can make it over that way is the Tallgrass Prairie Preserve located in north central Oklahoma. I've been there enough times to have identified several locations that potentially offer great photo opportunities. Even so, with each visit, the conditions have been so different they required a new and often changing evaluation of the situation.


The prairie possesses many changing moods and because of that when I am there I am constantly adjusting what I am doing. Early morning light on the prairie is fantastic with the rolling hills and shallow canyons often laced with mist or fog. By mid morning the light becomes much more harsh and direct which carries over well into the late afternoon. As the sun rolls closer to sundown, the angle of the light changes again casting shadows and creating shapes only seen during this magical hour. Factor in clouds and everything changes again. For each of those situations, a new evaluation of the conditions is required. Mid-day shooting means you have to focus in on details or capture the essence of a location through the use of contrast, color, and composition. Late afternoon means you need to find a different angle to shoot the same subjects you shot during the morning light. Near sundown, a large vista is required where you can capture one of those legendary prairie sunsets. In short, anticipate the potential of any given location and plan your shot accordingly, but leave yourself an opening to adapt to the changing conditions.

Location shooting requires a constant adjustment of what is required to capture the moment. Constantly looking for opportunities also requires you to see and look beyond the obvious and recognize how the dynamics of a location might change with a change in light. Effectively evaluate your situation and odds are you will capture some amazing photographs.


Wednesday, April 25, 2018

Being Seasick - It's True What They Say

It has been said there are two kinds of seasickness; one where you are so sick you are afraid you are going to die, and one where you are so sick, you are afraid you won't die. I've had both kinds and can attest to the validity and veracity of those statements.

I will never forget the first time I ever got seasick. It was one of the worst experiences of my life and was so bad, my fears about the meaning of the second statement rapidly threatened to end what few remaining minutes I was sure I had to live. It was November, 1973. Straight out of the Coast Guard boot camp I was assigned to one of the best duty stations then available in the Old Guard, The Umpqua River Lifeboat Station at Winchester Bay, Oregon. I was pretty green and inexperienced but filled with enthusiasm about the prospects of being a member of one of the elite units in the U.S. Coast Guard. So, when the opportunity came for me to make my first ride on one of the fabulous 44 foot motor lifeboats, the legendary CG44303, I jumped at the opportunity.


The Umpqua River Bar is considered one of the most treacherous crossings on the west coast. At it's worse, there could be multiple layers of 25 to 30 foot breakers booming across that narrow stretch of opening between the south and north jetties. When it was like that, nothing came in or went out. Our 44's were the only vessel capable of navigating through surf conditions like that, and we would only do so in an emergency. Luckily, for us on that day, the conditions were not so dramatic, but they were developing into a potential nasty situation with 10 to 12 foot breakers randomly breaking across the bar like rows of soldiers marching in rhythm to a musical beat. Several trawlers were wanting to come across before the bar closed up and were jumpy about coming across without a 44 on station.

Myron Dale our first class bos'nmate waved at me to come over.

"You ready for your first bar patrol?"

"You bet I am...let's do it", I said rather naively.

"Okay, then it could get nasty out there", he said warning me about what we might run into, " We could be out there for a while."

"I'm ready."


On our way out to ready the CG44303, because we would be on station through lunch, our cook made us some baloney sandwiches and handed us a thermos of coffee. Within a few minutes we had the 303 fired up and idled out of the boathouse.

Myron lifted the radio microphone and contacted the station, "Station Umpqua River...CG44303 underway." Red Oneil was our engineer on this run and his fire engine red hair poofed out from under his hat in a rather non-regulation manner. "Hey Sport...first time out huh." He said with his characteristic sandy-faced grin

"Yeah I guess so."

"Should be a piece of cake...we do this all the time. If anything happens, I'll tell you what to do...don't worry about anything."

I nodded again with my naive confidence.

The powerful twin Cummins diesels vibrated below deck and filled the air with their deep report even at idle speed. As we turned into the main channel, Myron shoved the throttles full forward and those engines roared like two lions after a kill. You could feel the power they possessed as they shoved the hull through the water. It was thrilling to say the least. I am finally here, I thought, actually getting involved in the action.

It took a few minutes to reach the bar area where we stopped just inside where the main channel crossed through. About five trawlers were lined up outside the bar waiting for it to lay down enough for them to come across. Breakers on the bar always occur in a series which varies somewhat, four or five, maybe as many as six or seven breakers before it will lay down just long enough to allow a boat to come through, then it starts all over again.

One by one they started coming across, The Midnight Sun, The Harmony....It took several minutes between each pass and slowly they crossed over without incident. Where we were sitting was pretty rough as we caught all the residual swells and chop coming off the bar and as well designed as those 44's were, they rode like an old bathtub rolling and rocking and kicking up and down, back and forth. Before long I began to feel the effects of all that random movement. My head started spinning, I burped several times and passed a few other assorted gasses, downwind. My insides started to feel woozy in ways I have never felt before. I moved around hoping by standing in another spot might alleviate the symptoms. It didn't work. The fumes from the diesel engines wafted like toxic, poisonous gases all around us exacerbating my situation. Red took notice of my situation.

"You're look'n a might peeked there Sport, a bit green around the gills. You gonna make it?"

"I ain't feeling so well..." I replied in a rather weak and pathetic voice.

"Well, Sport, what you need is to eat something...here, try one of these baloney and mayonnaise sandwiches. That'l fix ya right up."

Of course I naively took his advise and I never got past the first chew of the first bite. Over the side I leaned and the entire contents of my insides spilled like some vile poison onto the surface of the foam covered waters. Within seconds the seagulls swarmed all over that mess and fought over the larger chunks and my insides continued to empty themselves. Over and over, the retching continued unabated for several minutes to the point the only thing coming out was a thin line of yellow slime. My gut ached like nothing I have ever experienced. I literally thought I was dying.

All the while this was happening Red and Myron were laughing out loud at my plight. Not sure which made me madder, the seagulls or them laughing...I think it was the seagulls. After a few minutes I finally settled down and started to feel better. Red stopped his laughing long enough to comment on my situation. "See, told ya that would fix you up...got all that stuff out of ya and you feel better now don't ya."

I had to admit he was right, but good gosh all mighty that was the worst sick I've ever endured and I continued to retch a few more times until we headed in. Red gave me some advise afterwards. "Next time have ole cooky give you a bag of plain peanuts still in the hull and eat them while you are out there. Gives you something to do and keeps your mind off what's going on."

You know he was right and even though I still suffered from time to time with being seasick, I never again suffered quite as bad as that first time. By the time I finished my tour at the Umpqua River Station a few years later, I was a full fledged salty dog able to withstand even the nastiest of conditions...well...most of the time that is, as long as I had my bag of peanuts...:)


Monday, April 16, 2018

Add a Spark to Your Lighting With Gels

Natural and or existing light can be and is often very dramatic. However, the problem with natural light is you can't control it very well. Using shade, or a reflector, or some kind of diffuser gives you some limited ability to alter the light, but over all you are pretty well stuck with what nature gives you. Speedlites provide an alternative and versatile source of light, but even those have limitations. I do enjoy using speedlites and in recent years have turned to them more and more as a way to shape the light around my subject. What is exciting about speedlites is their ability to add color to your images thru the use of Gels.


Gels are simply thin transparent plastic sheets that fit over the head of the speedlight. They come in all colors but generally they are used to add warm or cool light to your image. Although they are relatively inexpensive to purchase, you can make your own quite easily. I have used colored, clear plastic document protectors cut to fit my lights. They work great, however the ones you purchase probably do have a more precise color cast to them.

One drawback to using gels is they will often reduce the power output of your lights. Depending on which ones you use and how many are stacked together, you can lose as much as a full stop of light output. This is easily overcome with some simple exposure compensation.


The best use of gels is to use them in such a way you do not realize they are there. A subtle cast of warm light or a gentle cooling effect is often all you need. Most of the time it is best to use them to enhance colors that already exist. The image above is a good example of this. Taken at the Corvette Cafe, we discovered lots of natural occurring bright colors as part of the 1950's diner experience. To create the image I used four speedlights and one 20x30 softbox. One of the lights was placed in the right hand corner of the cafe and used a pale blue gel which helped to enhance the chrome along the diner counter and provided a gentle rim light around our model. It also matched her dress. A pale blue light like this can often liven up dark corners and add a sense of cheeriness to the atmosphere. In the corner directly behind our model a light with red gel was used to fill in another dark space and to provide a matching contrast to the various red splashes found in the cafe. The gelled lights were set to a low power output to prevent overwhelming the image yet they added to the flavor of the scene. They looked like they belonged there and offered a subtle, pleasing effect.

There are times you might want to go for broke and use a strong color to add drama to your image. Bold colored gels can often transform an ordinary look into an image with a great deal of drama. The image below of the classic T-33 / F-80 Shooting Star is a good example. Taken just after dusk, I basically killed all the ambient light with the exposure settings and then built a bubble of light around the aircraft bouncing it off the tarmac so the airplane would define itself within that bubble. The bold nature of the light created a powerful look and transformed this wonderful static display into an image that jumps off the page.


Using Gels can be an exciting way to spice up your images. Used creatively you can turn what might be an ordinary picture into an image with a spark of excitement, one that generates an emotional response. The trick is to make it look like it belongs there.

Thursday, April 12, 2018

Why Combining Two Images to Make One is Sometimes Better Than Simply Shooting One Image

Sometimes I over-think things. I tend to get caught up in details of how and why something is the way it is. I've even been told, subtly mind you, that I over-complicate things and sometimes create a cluttered view of what I am talking about as a result. I know this to be true and do take it to heart, no really I do, but I just can't help myself when it comes to something where there is a revelation of sorts that seems to jump out at me. Take for instance the subject of this article. Based on the title you might be thinking, well, there he goes again. You'd probably be right, but hear me out, because I do believe this actually makes sense.


So, why is combining two images to make one, sometimes better than simply shooting one image to start with? Well, let me explain. First of all, this idea does not always apply to every situation.  In most cases a single, well-lit photo of a subject is more than adequate to create an appealing image. However there are circumstances where capturing two or more images, then combining them into one will create a more powerful looking image.

Let's take the picture above of an F-4 Phantom aircraft as an example. In recent weeks I have been concentrating on this particular shoot for several reasons and have included commentary in several blog posts about it. The more I began to study the outcome of this image, the more I began to realize  the final result could not have been made without the combining of two separate images. Had I used lets say six or seven flash units all at once, I potentially could have captured this image in a single shot. However, it would never have looked the same and might have even been inferior to the final image created using four speedlights and two combined images.

The reason is this. Had I used six or seven flash units at the same time, they would have been working against each other. Part of the appeal of this image is the dramatic use of light (red light in this case) bounced off the tarmac and then reflected back into the underside of the aircraft. Two other lights were used to illuminate the outside edges. This combination created the first image. Take notice how the light and shadows along with the reflections created a strong dramatic appearance.


After re-positioning the lights, a second image was created by pointing two lights toward the canopy and filling the front, top, and underside of the aircraft with ordinary white light. This flood of white light bouncing off the tarmac is what would create the problem if they were used at the same time as the wing positioned red lights.


In the final results, the second image was layered on top of the first image. The dramatic red light was then revealed by erasing portions of the top layer and leaving the  top half of the layer alone. Had I used six flash units at the same time, the additional two units pointing toward the canopy would have diluted and washed out the red light and shadows coming from behind the wings. The dramatic red light would no longer have been there, at least not at the same intensity levels. Also, most if not all of the Vanishing Point depth and dimension created by the shadows would have been lost.


By combining two separate exposures, the lighting effects of each individual exposure were fully realized without interfering with each other.


The image above is a sample of a similar aircraft that was captured in a single shot using seven flash units at the same time. Notice how the white lights seem to have washed out the power and strength of the red gelled lights. It's a nice photo, but without the drama that could have been, had we used two separate shots. Not every situation lends itself well to this technique, but, sometimes thinking through a problem and observing the results, however unexpected, can often reveal an exciting outcome.

So...maybe I do over-think problems a bit too much. I suppose it is a bi-product of 30 years of mainframe computer programming where that is what you do...everyday. Building a final image from multiple shots is not a new idea, but combining multiple images with creative lighting just might offer a way to experience the power and versatility of speedlights in a unique way. It sort of occurred to me just how much merit this concept really does warrant.

Sunday, April 8, 2018

Shaping Light to Fit Your Subject

Dusk was upon me before I was ready and the bright display lights at the Aviation Heritage Park in Bowling Green kicked on as the daylight faded. The lights were much brighter than I remembered and I was concerned they would interfere with my planned shooting for that evening. Turned out my apprehension was premature because in fact they actually helped out because they provided enough illumination so the camera could easily focus, but not so much to drown out the lighting I was planning to use. About the only issue with them was they created a florescent glow the camera wanted to interpret as a greenish cast. A simple tweak of the White Balance eliminated the threat, and I was confident the speedlights would provide enough horsepower to overcome any adverse affect they might have.


As part of the Adventure Photography series, my project for the previous two weeks was to capture the historical aircraft on display at the park. There were five beautifully restored ones all having a connection to Bowling Green and Kentucky. Capturing vintage aircraft such as these in such a way as to avoid reproducing the standard cliche images requires a bit of thought. I had to ask, then answer one question; How do I shape my light to fit my subject?

I could have taken the normal approach and simply pointed my lights at the aircraft and flooded them with light. I knew this would never fulfill my creative desire to capture them in a unique way. I also ran into the problem of having only four speedlights to work with when I actually needed six or even eight to do the job effectively. As I walked around the F-4 Phantom, a huge aircraft even though it was an air superiority fighter, I realized there was no way I was going to capture this magnificent piece of history without taking a multiple image approach, then combining two images into a new single image. The idea was to first illuminate the underside of the aircraft, then photograph the topside. These two images then would be combined to create the final photograph.

My first decision was to decide from which angle to shoot. The F-4 carries itself well from most all angles, but the most striking appeared to be from straight on. Using this angle allowed for a dramatic use of what is known in the art world as a Vanishing Point, where all straight lines tend to point toward a single converging point thus creating an illusion of three dimensions. This also created a sense of movement and speed.

The next problem to solve was how to light this enormous aircraft using just four speedlights. It was much too large to capture in a single photograph. Dramatic lighting was a requirement and to create this drama I was going to use a set of homemade red gels to cover two of the lights. The gels were made from a document protector cut to fit the dimensions of the flash units. Two other units would remain uncovered and provide a basic white light. The idea then was to indirectly light the underside of the aircraft by bouncing the light off the tarmac. Two lights each were clamped to the back edges of both wings with the lights pointing down with a slight angle forward. This lighting setup effectively illuminated the underside of the F-4, but the top part of the airframe remained relatively dark. The lights of course were fired remotely from the camera.


I placed the camera on a tripod and aligned the composition. After some test shots I settled in on an exposure of f/5.6 at 28 mm with a shutter of 1/15 and an ISO of 800, using a remote cable release. Part of the problem was to also eliminate or kill off most if not all of the ambient light spilling over from the background. Once that was confirmed as the best exposure to accomplish this, I locked the camera in place on the tripod and left it alone. The first image was captured.

I now had to capture the second image. With the underside of the airframe captured, I needed to position the lights in such a way as to throw some light across the front and top portion. To do this I used two tall light stands one each positioned just outside the wingtips and somewhat in front of the airframe angled toward the canopy. Leaving the camera setting alone effectively prevented any movement of the camera that could throw off the critical alignment of the two images when blending the final two shots into one.


Again it required several test shots and power setting adjustments to get the desired results, but once I had that accomplished, I was pretty well done for the night. All that was required from that point on was to blend the two images into a single new image and do some tweaking in Photoshop to clean up the image.


The idea of this entire exercise was to avoid simply using light to illuminate the F-4 but to use light to shape the subject. The tarmac in essence became part of the main sources of light. Drama was demanded for this aircraft, to do justice to its classic lines, its history, and to its legacy. Using speedlights to shape light so it fits the subject requires not only an understanding of composition, but of the versatility of using off camera flash. It also required stepping away from the ordinary and looking at the problem in an extraordinary way.

When the normal way of doing something falls short of your expectations, don't be afraid to shake up your approach, try something new, something unique, because only then will you be able to truly gain a comprehensive command of the photographic process. Always doing the same ole thing the same ole way can result in ordinary pictures of things. To create the extraordinary, to capture drama, requires a  unique and extraordinary approach. Shaping light to fit your subject, how better way to use the power and versatility of speedlights.

Sunday, April 1, 2018

Speed Light Magic: Creating Your Own Quality Light

Light in all of its magical colors is what transforms the ordinary photograph into an extraordinary photograph. Without quality light your images will most likely become just a simple photograph of an object, but toss in a light source that enhances the moment with its flavor and strength of character, then what might otherwise turnout ordinary suddenly is transformed into something that captures the imagination. Quality Light then, is the driving force behind all great photographs. Photographers crave it, they seek it out, they live for those events when time, place, moment, and light blend to become something extraordinary. Nature and circumstance, however, do not always cooperate. Sometimes they fail completely to provide the kind of light required to create those special moments. When light failure happens, you can with a little help create your own quality light. You do so by employing the power and creative edge Speed Lights provide.


Not so long ago I avoided using speed lights. My excuse was "I prefer to shoot in natural light." The truth was, I was afraid of using them because I didn't understand how they worked. My understanding of using 'A Flash' had roots going back to the old flash cube days where those little portable pocket cameras used one of those cubes to flood the area with light. Their range was limited to about 8 or 10 feet, and their light was harsh and direct often creating not only washed out features and strong shadows, but unwanted red eyes. Unfortunately, most peoples indoctrination into using 'flash' was similar to mine and as a result we developed incorrect mindsets of how flash photography was suppose to work.

In more recent years I found myself becoming more intrigued by their use because through the magic of the internet the real professionals, who know how to use artificial light, share their knowledge. The more I watched them work, the more I realized just how wrong I had been about speed lights. Used properly they can open up a whole new realm of photographic opportunity. Even so, I still struggled to understand the basic principles of their use. I was stuck, again, with a mindset developed through years of using the exposure triangle: f/stop, shutter speed, ISO believing that all exposures were strictly influenced by these axioms no matter who, what, or where you were shooting. Being trapped inside this exposure bubble mindset stymied my progress to understanding how to use speed lights. Then one day, after watching a Joe Brady video on the basics of using off camera flash, that bubble exploded and it all, for the first time, made sense. Even so, putting this understanding into practice took time along with trial and error, lot's of error. The journey has been extraordinary and I'd like to hopefully burst the exposure bubbles of those who also find themselves trapped inside. Let's take a closer look at the basics of this fascinating form of photography.
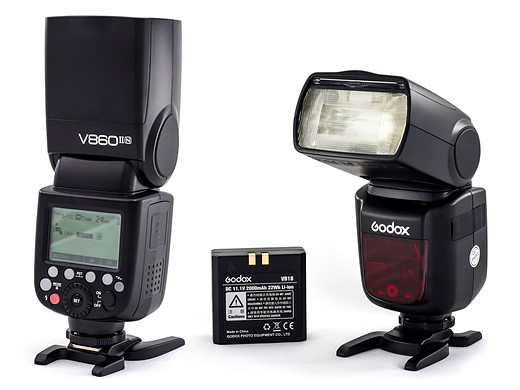
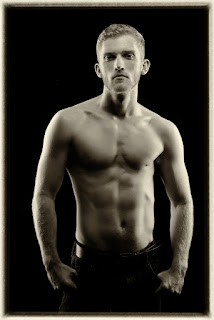
A single OCF 
First let's take a quick look at how a flash works with your camera. Simply stated, the flash must fire in sync with the shutter operation. The shutter opens, the flash fires, the shutter closes. In the old days, flash/shutter sync was limited to 1/60th or possibly 1/125th of a second depending on the camera. If you tried to fire the flash using a shutter speed higher or lower than this the flash would most likely not fire at the right time and create a dark line usually along the bottom or top of the image. This is because the flash would fire either before the shutter was fully open, or after it was already partially closed. Fortunately, today's digital cameras are much more versatile and the flash will sync with a variety of shutter speeds usually up to 1/200th or possibly 1/250th of a second. You can even shoot them in what is called a high speed sync flash mode, like 1/1000th of a second or faster, but that is a bit more advanced than we need to cover right now.

You can set your shutter speed just about anywhere up to the maximum flash sync speed and the flash will fire properly. But, that brings up the question of exposure. Now most name brand camera's and flash units will fire in what is known as TTL mode, or Thru The Lens exposure. This varies a great deal depending on the camera and the flash unit being used, but fundamentally this means the camera and the flash talk to each other to the point the flash knows how much light to output to create a correct exposure based on the camera settings and ambient light. We won't go into how they do that, just remember TTL is a flash exposure method that talks to the camera usually by using the popup flash on the camera as the trigger.

Let's talk briefly about the flash power settings. Depending on the unit, the output from the flash can be controlled to allow for full power settings with increments down by factors of two...like 1/2, 1/4, 1/8, 1/16....1/128, you get the idea. What this really means is this. The brightness of the light coming off the flash is exactly the same for all power settings, the difference is the length of time the light is allowed to fire. A setting of 1/4 will have a light pulse 4 times faster than a full power setting.

We briefly discussed TTL, so now we will look at shooting the flash in a manual mode. Shooting manually is actually my preferred method of using off camera flash. This gives me full control of the light and exposure. This is where you need to adjust your understanding of the exposure triangle.

When shooting a typical landscape you are setting an exposure based on a single zone of light. The light on the landscape comes from one source, the sun either directly or filtered through clouds or something like that. You use the exposure triangle to achieve the desired exposure, shutter speed, aperture, ISO. Shooting with an Off Camera Flash (OCF) is different and this is an important difference to understand. When using an OCF you are controlling two zones of light at the same time. What this means is your overall exposure is based on the background light or ambient light and the exposure on your main subject is based on the light coming off the flash unit. So...in essence you are setting your exposure to capture different sources of light at the same time.

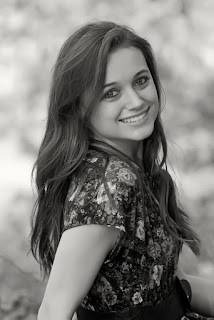
Controlling two zones of light
The OCF can be a single flash or multiple flashes from different angles and power settings. The ambient light is the light that naturally exists around you. It can be light from nature or from other sources such as indoor lighting, or street lights, a large window, or anything that is not coming from the flash. Call it background light if you like, it is simply the light that is already there that influences the exposure setting.

Now, this is important to understand and is the crux of most of the confusion of how to shoot with OCF. When shooting with an OCF you control the background ambient light exposure using the Shutter speed. You control the light off the flash using the Aperture. To simplify the concept just think of the OCF light as fill light used to illuminate your main subject and the ambient light is what illuminates the area around and/or behind your subject. To control both the easiest way is to set your background exposure based on the ambient light, then adjust your OCF power settings to provide the proper amount of fill light. By doing this, you are then controlling both zones of light at the same time. Let's say your background exposure is 1/125th at f/8.0 and ISO 200. In order to use an OCF to illuminate you main subject, it needs to be set to provide a light pulse that is equivalent to f/8.0. This may require some guess work, or you can use a light meter to see exactly how much light is coming off the flash.

If you change your shutter speed, lets say to 1/200th after making your OCF lighting adjustments, it will not affect the light and exposure coming off the flash. The background ambient light will be darker, but your subject will still receive the same amount of light off the flash. Think about that for a moment. Why is that? Well, the reason is this. When the flash fires, it generates a given amount of light for a specified amount of time based on the power setting. Generally speaking, the duration of the flash is usually very short, something like 1/2000th of a second or faster depending on the power setting. If you change the shutter speed say from 1/125th to 1/200th and retain the same aperture setting, the flash duration is still considerably faster than either of the shutter speeds and the same amount of light will be captured from the flash unit regardless of which shutter setting you select. The faster shutter speed will affect the ambient light making it appear to be darker or more underexposed, but does not affect the OCF light, so your subject will still remain properly lit. In fact, you could in theory eliminate all of the ambient light to create a total black background with the proper settings. However, should you adjust the aperture say from f/8.0 to f/11, then you will affect the OCF light exposure because now your flash is still outputting light at f/8.0, but your aperture is set to allow a full stop less light into the camera. To keep the same OCF exposure, you would need to increase the power output from the flash unit to equal the f/11 setting.

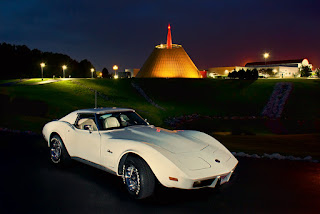
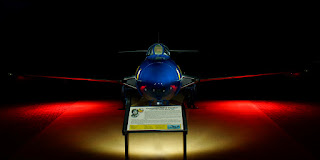
Picture taken outdoors before dusk
All Ambient Light removed by exposure
settings so background is black.
Used two OCF Strip Lights and one
Octobox light overhead

So, the next question is, how do you trigger a OCF? Well, there are multiple ways to do so. Actually, your flash unit will most likely have three basic settings; Wireless TTL, Manual, and Slave. Some flash units can have variations on these settings, but those are the fundamental three. Wireless TTL is most easily triggered by the popup flash on your camera. Once the camera and flash unit are set in wireless mode, the camera and flash talk to each other through a series of light pulses just before the main exposure flash fires. It all looks like a single pulse to the unaided eye, but in reality several short bursts of light fire off before the final exposure is made. A separate Commander flash unit sitting on top of your camera will accomplish the same thing. Another way to trigger your OCF is to use an electronic transmitter/receiver setup. The transmitter sits on top of your camera on the flash boot. The OCF flash is connected to a receiver unit that receives the signal from the transmitter. When the shutter release is fired, the transmitter fires sending a signal to the receiver to fire the flash. Depending on the kind of transmitter/receiver unit used, you can also make adjustments to the flash from the transmitter, things like changing the power settings. Some simply act as a trigger. The Slave mode is a flash setting that allows the flash unit to be triggered by any other flash. When any flash fires, the sensor in the Slave units detect the change in light and causes it to fire at the same time. This can be useful when combining different brand name flash units, or when only one transmitter/receiver is available. The Slave mode will ensure all flash units work together.

Using Multiple flash units
Okay, I know it sounds confusing...but it really is not all that complicated once you begin to apply those principles to your photography. It does take some practice to learn how to shoot with OCF and make it more instinctive, but once you begin to experience the results, you will begin to grasp what is happening. More importantly, you will also begin to see how you can use this knowledge to your advantage and start applying it to different situations. All we've done in this article is to introduce the basics and encourage you to give it a try. The best way to learn how to use OCF is to do it, so don't be afraid to give it a try. Even with a single OCF flash unit, you will open up a whole new world of photographic opportunity. The key is to use it creatively and in such a way it appears to look natural.


p.s.

There are numerous third party speed lights (flash units) available at very reasonable prices that work very well. With a little shopping around, you can get started for well under $200.