In our previous post we looked at how to photograph the Milky Way with ordinary DSLR equipment using a 30 second exposure and a wide angle lens. For most night sky photography this process works well and can offer a tremendous amount of satisfaction in capturing the wonders of the night sky. Sometimes though, we may want to increase our exposure times to accumulate more light, or we may want to use a longer, more powerful lens to look at deep sky objects, or to simply gather more digital information from the Milky Way in order to bring out more details. To do so requires that you be able to track your camera at the same rate as the apparent motion of the stars across the sky. We do this by employing a Star Tracker. As the final of our 3 part series of Breaking into Astrophotography, let's take a look at how we do this.
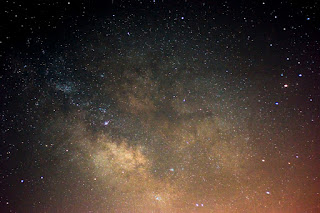 |
| Dark Horse Detail - 103 Sec @ f/3.5 35mm ISO 800 |
What You Need To Know: Standing outside in a field looking up at a star filled night sky, the stars may appear to be motionless. To our unaided eyes, they do indeed appear that way, but the earth is spinning like a top and because of that, the stars do move across our field of view. When photographing them with a wide angle, you can take relatively long exposures and still have the stars appear as pin points of light. That is because they are so small relative to the field of view. However if you allow the exposure to continue past 30 seconds or so, those stars will begin to show a trailing tail or an elongated streak.
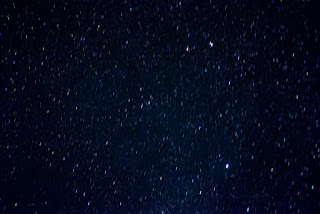 |
Untracked stars scene - 40 Sec f/4.5 ISO 800 using a 105mm lens
Notice the star trails |
The longer you go, the more pronounced the streaks. In order to capture longer duration exposures, a star tracking devise is necessary. Star Trackers are relatively simple devises that compensate for the rotation of the earth and keep the camera pointing at the same spot in the sky regardless of earth's rotation. There are a variety of types both commercial and homemade.
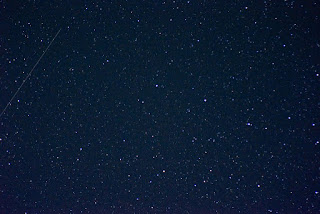 |
Tracked 60 sec f/4.5 ISO 800 105mm
No star trails |
Facing north, about 40 degrees or so above the horizon in the northern hemisphere sits Polaris, the Pole Star. Polaris appears to be stationary while all the other stars rotate around it. That is because the earths north pole is almost aligned exactly with Polaris...it's actually a little bit off, but more on that later. Polaris is actually the last star in the handle of the constellation known as the Little Dipper, or by some as the Little Bear, or Ursa Minor. It is not a particularly bright star, but easily sighted with a little help.
Not far from the Little Dipper lies it's larger cousin called The Big Dipper (Big Bear or Ursa Major), perhaps the easiest to locate and best known constellation in the sky. The outer two stars of the Big Dipper's cup roughly point toward Polaris making it relatively easy to locate.
Polaris is very important when trying to photograph the night sky by using a tracking devise and we will explain that in a moment.
Star Trackers: As already stated, there are numerous commercially produced Star Trackers. Some are designed to track the sky using a telescope that allows you to attach a camera to it
piggy-back style. Others are stand alone units that mount onto a sturdy tripod, and still others are simple devises call
Barn Door Star Trackers that you can make yourself. All of them, however different in design, accomplish the same thing. They simply track the sky at the same rate of motion of the earths spin. We will limit our discussion to using a DIY Star Tracker known as a Barn Door Tracker.
The Barn Door Tracker: As mentioned, you can opt to purchase a commercially available tracker or you can build one yourself. The most common DIY tracker is the Barn Door variety. Let's take a look at how they are built and operate. There are as many varieties of Barn Door trackers as there are people who build them, but they all operate basically the same way. Two pieces, usually wooden boards, are hinged at one end with a single screw type drive shaft, that can be hand operated or motor driven, at the other end. The basic idea of their operation is to attach the camera to a small ball head on the upper board near the hinge, and for the drive shaft to turn one full revolution per minute which, because of the screw action of the shaft, moves the upper board in a shallow arch. The arch movement mimics the movement of the sky.
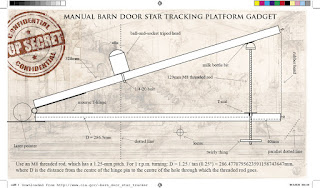 |
| Internet Photos |
There are some relatively precise measurements that must be applied to it's construction, but all of that depends on the design of the unit, and there are numerous designs available online. A basic unit will cost less than $20.00 to build. Even with some enhancements, I have less than $40.00 invested in mine.
Using The Barn Door Tracker: To use the Barn Door Tracker, it must first be attached to a sturdy Tripod of some type. I use an old equitorial telescope tripod mount from an inexpensive telescope I used to have which works great, but just about any sturdy tripod will work when the tracker is properly secured in place.
It also needs to be aligned with Polaris with some degree of accuracy. The alignment point falls approximately midway between Polaris and the Star just in front of it, known as Yildan, on the Little Dipper's handle and must be on a line that intersects Polaris and the last inside star, of the Big Dippers handle. (See Photo) This offset alignment is known as the North Celestial Pole or NCP. It represents the actual point the north pole points to. Polaris actually rotates around this point as the earth spins. There are other stars near Polaris that can be used to refine the alignment, but for wide angle photographs of limited time say up to 2 minutes or so, this alignment configuration will work very well. Certain times of the year the Big Dippers handle is not easily seen as it sits quite low in the sky, so you can use the last star in the Little Dippers cup as a reference alignment point...just make the connecting line run slightly outside of where it sits.
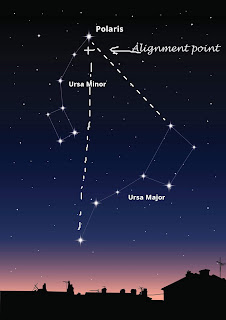
To make the alignment, you must adjust the Tripod in such a way so the Hinge is on the left and is pointing at the indicated alignment point. Some builders use a simple soda straw that is attached to the hinge to aide in the alignment, some use a green laser pointer. On my tracker I attached an old 4X rifle scope to the hinge mounting with a simple bracket. The small scope helps with finding Polaris and the cross hair X helps with precisely pointing it to the correct alignment point. Please note, the relative Alignment point will change through the season as the Big and Little Dipper's rotate across the sky. Sometimes it will be located below Polaris, later in the year it will be above it. It just depends on the seasonal orientation of the Little Dipper.
To operate a basic tracker design, you can simply attach an arm on the drive shaft and rotate it by gently turning it with your finger...Every 15 seconds you simply rotate it 1/4 turn. Over the course of one minute, you will have turned the shaft 1/4 turn 4 times and it will make the required full 360 degree turn. You can make accurate exposures up to several minutes long with this method if you are careful. This works well if you are simply shooting the stars with a relatively wide angle lens. However, should you use a longer focal length lens, a small 1 rpm battery driven electric motor will operate the tracking rotation much more smoothly allowing for more accurate tracking. The motor in effect replaces your turning finger and helps to eliminate possible vibrations caused by that kind of manual rotation. The motor provides a continuous motion, while the manually turned method is stop and go.
Over the course of a couple of years I modified my tracker to use such a motor and also attached a digital voltage regulator that allowed me to precisely control the voltage going to the motor. This helps to insure the tracker is rotating at exactly 1 rpm.
Why Should I Bother With a Tracker: A tracker allows you to make longer exposures which gathers in more light thus creating a more detailed image. It is also necessary if you want to capture deep sky objects like the Orion Nebula or Andromeda. Without a tracker, doing so becomes much more problematic. I have used upwards to a 500 mm lens. It is about the maximum it can support simply because of the weight, but it does work well. Remember too, you do not always need a lot of magnifying power, bu you do need resolving power and that is where a good quality lens comes in. Also, remember, the larger the lens, the more critical the alignment becomes and the more critical vibrations become. A 500 mm lens will magnify even the slightest movement of the tripod or tracking devise. The key points are to have the devise properly and accurately aligned and for it to be sturdy.
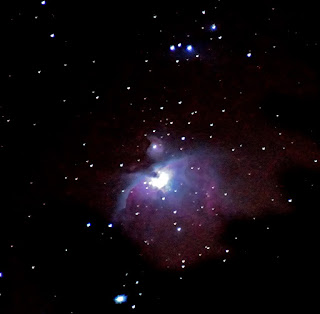 |
Orion Nebula - 20 Sec Exp - 500mm cropped - f/6.3 ISO 3200
The red color is caused by glowing excited hydrogen atoms and is captured by the digital camera. Even when viewed through a good home telescope not much color will be revealed because our eyes are simply not sensitive enough to discern the subtle nature of the nebula gases. Only in a photograph will the color be seen.
|
The Results Speak for Themselves: Using a tracker takes some practice. There is a learning curve and some trial and error involved. But, once you get the hang of it and see that first successful capture using one, the results will astound you. There is a great amount of satisfaction from using a DIY devise that actually works.
There are other ways to capture deep sky objects most of them require you to take a series, at least 100 to 300 shots, of short duration exposures and use a specialize software to '
Stack' them into a finished image. These stacked images include images used to cancel out noise, but the results can be spectacular. However, using Stacking software requires a lot of computer power and they are not always user friendly.
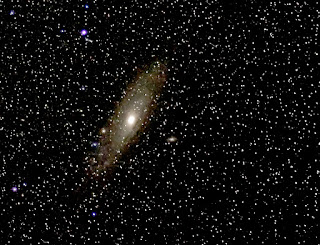 |
| Andromeda Galaxy Tracked exposure |
Summing Up: Every season I look forward to once again hearing the buzz of the tracking motor and to watch the tracker doing its thing. Most of all, I look forward to seeing and sharing the results.
Photographing the night sky is a learned skill that virtually any photographer can do with a little practice. I hope this short 3 part series has peaked your interest in this fascinating form of photography. I promise you, once you have tried it, your interest in Astronomy and
'What's Out There' will surely increase.
 I find it comforting the way the backroads of Kentucky seemingly weave and twist and converge upon themselves. Not any kind of rhyme or reason to their meanderings, they just follow the lay of the land and end up where they were meant to arrive. Coming from Oklahoma where all the roads were situated across a giant grid, I found myself lost several times as first I explored the natural charms found across Kentucky. One road may change names about as often as it changes directions here with side roads leading off into a patch of enchanted woods or across a nostalgic low water bridge that spans crystal waters flowing across ancient gravel. It is the haunting call of the side roads that entices a photographer for they represent the very best the state has to offer. Photographs of the low keyed life discovered along these often forgotten places is best presented in black and white for it is within this realm the true charm and simplicity of this wonderful example of Americana can be found.


