ESTABLISHED 2010 - Beyond The Campfire was created to encourage readers to explore the great outdoors and to observe it close up. Get out and take a hike, go fishing or canoeing, or simply stretch out on a blanket under a summer sky...and take your camera along. We'll talk about combining outdoor activities with photography. We'll look at everything from improving your understanding of the basics of photography to more advanced techniques including things like how to see photographically and capturing the light. We'll explore the night sky, location shoots, using off camera speedlights along with nature and landscape. Grab your camera...strap on your hiking boots...and join me. I think you will enjoy the adventure.

Saturday, October 20, 2012

It Ain't About What You See...It's About What You Feel....so...don't settle for Average


The main difference between Ansel Adams...and most of us...is that he looked at photography from an artistic perspective...he experimented...tried different techniques...he never settled for ordinary...and he understood the capabilities of his camera equipment.


Camera's really are not all that smart. In spite of the sophisticated electronics and the built in auto exposure capabilities, they still only read the light in such a way as to make a best guess calculation and move the exposure to the middle of the scale. If all you are wanting to accomplish is to take snapshots and capture simple pictures with very little artistic merit, then the auto exposure works pretty well.  It's been a great marketing ploy for the camera manufacturers...making it easy to take decent photo's without thinking to hard.

But, when it comes to capturing images with artistic merit...well...now that requires a bit more...let's say... understanding of what the camera is actually doing. I don't have room here to go into a long explanation of all the functions of digital camera's. But, what I'm going to do is give you an example of the difference between what happens when you simply allow the camera to do what it wants to do...and you telling the camera to do what you want it to do.

Most of my photography involves nature and/or landscape photography. As a result, I tend to shoot almost exclusively in Aperture Priority...that is where you select the aperture or f/stop and the camera selects a corresponding shutter speed. Aperture priority allows me to control the depth-of-field which is important in landscape photography. I also use a lot of exposure compensation...you know...that little +/- button usually on the back or maybe the top of your camera...anyway...I rarely shoot in full manual mode.


Another aspect of digital cameras is how white balance affects the image, or how well the camera captures color depending on the temperature of the light. (Indoor lighting has a different temperature range than daytime outdoor light). Most digital camera's allow you to change the white balance, but I would guess most people simply use the auto white balance (AWB) setting and just let the camera make that choice for them. White balance can also be adjusted by using the group or symbol settings...like shade, or cloudy, or portrait...these actually help quite a bit and are easy to use.

AWB works pretty well within a set range of light temperatures.  If the light on your subject falls outside that range, then AWB will often shift the color either toward the blueish or reddish side depending on the light temperature situation. Knowing and using this to your advantage can have a huge impact on how your images turn out.


Here's an example.  This first image above was taken simply allowing the camera to do what it wanted to do. It's not a terrible picture...but right away you may notice that it seems to have a rather bluish tint to it.  That's because the light temperature at the time fell well outside the normal range of the AWB capabilities. What I was experiencing visually and emotionally was a deeper, richer lighting situation...So, how then did I manage to capture the next image taken just a few minutes later?


Both images come straight out of the camera...no Photoshop tweaking was done to either of them. The bottom image is a much more powerful image...richer...deeper...more dramatic in its texture and overall effect.  Well, basically there is only one camera setting difference between the two images. Instead of using AWB, or either of the Shade or Cloudy setting on the camera...I switched over to manual White Balance and shifted the setting from it's normal middle of the road 5500 degrees kelvin to 9900 degrees kelvin. That simple shift told the camera to push the color setting from a middle temperature range to a range that more closely matched the color temperature of the sky at the time.  Doing so caused the camera to capture the scene in a much bolder rendition.

The reason I am explaining all this is to re-enforce the idea that photography is not always about capturing exactly what you see.  It's about capturing what you feel. Understanding how the camera reacts to light is one of the first advanced concepts that novice photographers should understand. Doing so gives you a tremendous advantage when it comes telling the camera to do what you want it to do...instead of simply accepting what the camera wants to give you.

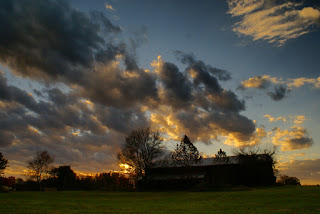
Here's another example.  This next image is one where I basically allowed the camera to do what it wanted to do...I did use a graduated filter to darken the sky some and tweaked the brightness a bit in Photoshop, otherwise it is pretty much the way it looked coming out of the camera and represents the scene very closely to what it actually looked like.


Overall...it's not a bad image with some interesting cloud features. But, looking at it tells me one thing.  I've seen this kind of image a thousand times...I've taken this kind of image a thousand times.  Other than the unique cloud formations there really isn't anything extraordinary about this image. But, remember...photography is not about what you see...it's about what you feel. So...knowing this I wanted to capture the scene in a different way... a way that would generate more drama...more power...more depth and impact. So...I shifted my location to gain a more dramatic composition and...once again...I shifted the WB to manual...and pushed the setting from 5500 to 9900...here is the result.


Same lighting...same basic scene...Big difference.  Which one portrays more drama...which one looks ordinary? Did the scene actually look like this?...not really...but that is the way I wanted it to appear...that is what I was feeling...what I visualized the moment should be and could be.

Understanding that what the camera sees is not necessarily what you see is one of the most difficult concepts for novice photographers to grasp. Understanding this...combined with a solid working knowledge of the mechanics of your camera...can result in creating amazingly bold and powerful images even under rather ordinary circumstances.  It's also important to remember that you don't have to settle for what the camera wants to give you...in most cases what it offers is simply an average...and we as photographers should never settle for average.

Keith


Tuesday, October 16, 2012

A Sense of Scale

There was good flow of water ripping over the edge of the falls at Shanty Hollow that day, yet the images I made just didn't seem to capture the effect of what it felt like to be there. What was missing was that sense of scale that one gets while standing at a location in person. As I worked my way around the edge of the pool at the base of the falls, I tried to visualize just how best could I capture this moment.  Then it became apparent. To capture the grand scale of the location...I needed to get lower...way lower...and shoot upward. I knelt as low as I could without getting the seat of my pants wet...it was a bit chilly that day...and framed the shot using a 18 mm wide angle lens oriented to the vertical. I used a small aperture...f/22...and focused about half way between what was directly in front of the camera and the rock wall where the water dropped. I was careful to include a good portion of the flowing water as it rolled over the rocks at the apex of the outlet stream. The result was a photograph that for the most part captured a greater sense of the scale of the location.

Scale is one of those things we rarely think about when photographing a location. In reality it's one of the most important things to be aware of especially in certain circumstances. The idea is to use scale to provide a sense of largeness or smallness to the moment. Doing it effectively can be a challenge, but there are techniques one can use to enhance the prospects of capturing a greater sense of scale.


One technique is to include something in the foreground...middle ground...and background in the same frame. This technique adds depth and distance to your composition. Usually a wide angle lens works best for this kind of shot...but can be done even with a 50 mm normal lens. In order to keep it all in focus, a small aperture is required...something like f/22...to extend the depth of field range. This often results in a slow shutter speed which also dictates the use of a tripod.

Another technique is to shoot with a wide angle lens from a low perspective looking upwards...like what was described in the first paragraph. These low perspective angles will automatically increase the sense of scale simply by the distortion effect of having part of the scene so close to the camera lens.

Image was created using five or six vertical shots stitched
into a single shot. The result added a lot more depth and
distance to the scene
Another way I've used to improve that sense of scale is use several images stitched together. This takes a bit of practice and some savvy using Photoshop...but it is a very effective method. What I normally do is to use a wide angle lens...18 mm or smaller...and take a series of images...usually five to six that overlap by about 30%. These images tend to work best when taken in the vertical or portrait orientation. Then using the panoramic stitching feature in Photoshop...stitch them into a great image than what would be possible using a single image.

Capturing scale often requires some forethought and a willingness to think through the problem. Recognizing when the moment requires a sense of scale may very well be the most difficult part of the process. It certainly requires the photographer to purposely set out to accomplish capturing that sense of scale as compared to capturing a routine image.

Scale is a great way to draw the viewer into your images. Capturing it requires some purposeful practice.

Keith


Thursday, October 11, 2012

The Importance of Background

Way too much background clutter - Too many
things competing against my main subject - Not
a good example of an effective background
She was a talented young lady performing at Bowling Green's International Festival and I found myself taking a number of photographs during her performance that year. The light was bad...but I wasn't too concerned. These were just fun shots after all, so I did not take into account many of the things I would ordinarily look for. Later, after I had downloaded the images, I came across that series and right away realized I had made some really bad photographic mistakes...the worst being not paying attention to the background. Although the photographs were not terrible, it was obvious to me that the clutter scattered across the background had all but ruined the images. Oddly enough, I've used some of those images in workshops as examples of what not to do.

Much stronger background Isolates
subject and works with the story
Not staying alert to the background is one of the prime ways to ruin your photographs. This is most readily evident with people shots, but it also applies to all kinds of photography, such as wildlife, nature, and studies of shape and form. Background is important because almost every effective image requires an effective background and every image that is successful often owes that success to the effective use of background. It is rare that the two are not connected.

An effective background works by helping to isolate your main subject...yet at the same time it provides a sense of depth and connection to the story of the image. Backgrounds do not have to be something that is recognizable. Actually, they probably work best when it is not, but they do need to blend well with the subject. What you do not want is a background that competes with your subject.

Light background enhances the darker subject
Backgrounds can relate to the subject, or they can provide a contrast. Often it is how the color is distributed across it that influences the eventual outcome of the image.  Not all backgrounds need to be blurred blobs of out of focus color, they can be crisp and solid...but they must in both cases...complement your main subject.

Receding backgrounds with angles of light often
generate a wonderful sense of place and depth
What I look for in an effective background is something that will help to isolate yet provide a sense of place for my subject. Many times simply moving to the right or left a step or so will position my subject in such a way as to take better advantage of how the light plays across the field of view. A simple change of perspective will also make better use of framing. I also like to play against contrasts...something like dark against a light background...or light against a dark background. Color use is also important, and contrasts of color will often generate a vibration that is very catchy and powerful.


Sometimes, location dictates the background. Even so, by first thinking about how to use that location to give your image a sense of place, you may find yourself moving, bending, twisting, kneeling, or even climbing higher to position your subject against a background that works to bring out the characteristics you are looking for.


As I have said many times, there is more to photography that taking pictures. So when photographing your subjects...don't just concentrate solely on the main subject...think about placing your subject within the context of the environment and use the background to enhance and bring interest and strength to your composition.

Keith