ESTABLISHED 2010 - Beyond The Campfire was created to encourage readers to explore the great outdoors and to observe it close up. Get out and take a hike, go fishing or canoeing, or simply stretch out on a blanket under a summer sky...and take your camera along. We'll talk about combining outdoor activities with photography. We'll look at everything from improving your understanding of the basics of photography to more advanced techniques including things like how to see photographically and capturing the light. We'll explore the night sky, location shoots, using off camera speedlights along with nature and landscape. Grab your camera...strap on your hiking boots...and join me. I think you will enjoy the adventure.

Thursday, August 2, 2018

Other Values - The Fine Pleasantries of Being a Photographer

It was a typical early summer day on Oklahoma's Tallgrass Prairie , hot and windy, and as the day tumbled toward its last few moments of daylight, I felt a bit relieved when the heat of the day began to dissipate behind the few clouds that hovered above the horizon. The high knoll upon which I stood offered a 360 degree view of the surrounding landscape, magnificent, awe inspiring, simply beautiful. Shadows began to grow longer and filled the gaps between the undulations of the land. Somewhere off to the south a family of coyotes began to howl and their movement caught my eye as they set out in pursuit of dinner. I watched them as best as I could until they were gone. Just knowing they were there added to the natural flavor of the moment.


My camera attached to my tripod stood ready to capture the last vestiges of the day anticipating one of those legendary prairie sunsets. For some reason, I sat silent and made no attempt to capture a photograph. The moment lived of itself and presented to me an image in such a way that a single photograph could never capture the essence of what was there. There were other values at play, values which are only experienced emotionally, pleasures for sure of being a photographer.


As a photographer I have been fortunate to have experienced a great many such moments. They were moments captured by the imagination that otherwise would have been lost. As much as I relish capturing amazing moments of light, I relish as much the experiences associated with having been there to do so. There are other values to being a photographer which are difficult to convey and can most easily be appreciated by having experienced them yourself. Being a photographer of light places you next to moments such as those if you are willing to be there.


I once had a friend who I took fishing with me. He was a nice enough sort of fellow, but as our fishing trip turned into one of those 'nothing was biting' kind of days, his complaining about the day being a big waste of time began to dominate his conversation. By the time we pulled out, I was certain I would never again take this person fishing. He completely missed what it was all about. He focused on catching fish as the measure of our day. I focused on just being out and enjoying the day. When the fishing portion of our day went bust, his day was ruined, but, other than having to listen to his griping about it, my day was just fine. Photography is the same way. There are days where things simply do not work, but the point is to enjoy just being there to allow the day to present itself to you in whatever mood it happens to be in.

Because of photography I have witnessed amazing sunsets and sunrises. I have felt the wind and rain across my back. I have been caught in violent storms and other amazing moments of nature. I have seen the delicate forms of creation, and followed the life cycle of a nest of Robins. I have known the boldness of fall colors and the intense grip of a winter blizzard. I have been thirsty, cold, tired, wet, and sunburned, yet I have also captured amazing moments of natures light. I have missed sleep, and stayed out until the early hours of the morning to capture a night sky so filled with wonder it defies our sense of what is out there.


I have canoed, hiked, and driven countless miles to hopefully capture that one photograph I knew might be there, and then did it again and again, until the photo I wanted finally appeared. I have captured the subtle beauty of the human form and the aggressive forms of wild nature. The exhilaration of having been there to experience all of these kinds of moments far outpaces the discomfort for having done so. Rewards for being a photographer are not always granted based on outcome. They are more often given for having made the effort. When the moment pays off with a spectacular image...well, the reward is self fulfilling.


Saturday, July 28, 2018

Breaking Into Astrophotography Part 3 - Tracking the Stars

In our previous post we looked at how to photograph the Milky Way with ordinary DSLR equipment using a 30 second exposure and a wide angle lens. For most night sky photography this process works well and can offer a tremendous amount of satisfaction in capturing the wonders of the night sky. Sometimes though, we may want to increase our exposure times to accumulate more light, or we may want to use a longer, more powerful lens to look at deep sky objects, or to simply gather more digital information from the Milky Way in order to bring out more details. To do so requires that you be able to track your camera at the same rate as the apparent motion of the stars across the sky. We do this by employing a Star Tracker. As the final of our 3 part series of Breaking into Astrophotography, let's take a look at how we do this.

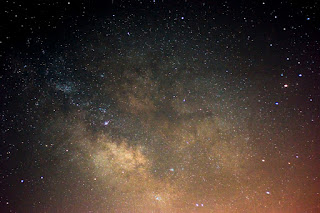
Dark Horse Detail - 103 Sec @ f/3.5 35mm ISO 800


What You Need To Know: Standing outside in a field looking up at a star filled night sky, the stars may appear to be motionless. To our unaided eyes, they do indeed appear that way, but the earth is spinning like a top and because of that, the stars do move across our field of view. When photographing them with a wide angle, you can take relatively long exposures and still have the stars appear as pin points of light. That is because they are so small relative to the field of view. However if you allow the exposure to continue past 30 seconds or so, those stars will begin to show a trailing tail or an elongated streak.

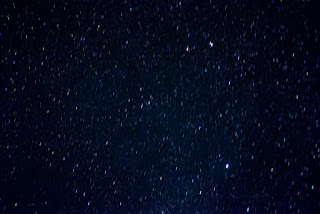
Untracked stars scene - 40 Sec f/4.5 ISO 800 using a 105mm lens
Notice the star trails

The longer you go, the more pronounced the streaks. In order to capture longer duration exposures, a star tracking devise is necessary. Star Trackers are relatively simple devises that compensate for the rotation of the earth and keep the camera pointing at the same spot in the sky regardless of earth's rotation. There are a variety of types both commercial and homemade.

Tracked 60 sec  f/4.5  ISO 800  105mm
No star trails
Facing north, about 40 degrees or so above the horizon in the northern hemisphere sits Polaris, the Pole Star. Polaris appears to be stationary while all the other stars rotate around it. That is because the earths north pole is almost aligned exactly with Polaris...it's actually a little bit off, but more on that later. Polaris is actually the last star in the handle of the constellation known as the Little Dipper, or by some as the Little Bear, or Ursa Minor. It is not a particularly bright star, but easily sighted with a little help.

Not far from the Little Dipper lies it's larger cousin called The Big Dipper (Big Bear or Ursa Major), perhaps the easiest to locate and best known constellation in the sky. The outer two stars of the Big Dipper's cup roughly point toward Polaris making it relatively easy to locate.

Polaris is very important when trying to photograph the night sky by using a tracking devise and we will explain that in a moment.

Star Trackers:  As already stated, there are numerous commercially produced Star Trackers. Some are designed to track the sky using a telescope that allows you to attach a camera to it piggy-back style. Others are stand alone units that mount onto a sturdy tripod, and still others are simple devises call Barn Door Star Trackers that you can make yourself. All of them, however different in design, accomplish the same thing. They simply track the sky at the same rate of motion of the earths spin.  We will limit our discussion to using a DIY Star Tracker known as a Barn Door Tracker.

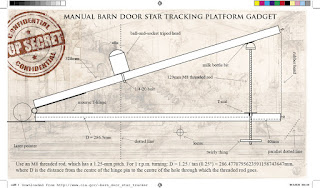
The Barn Door Tracker:  As mentioned, you can opt to purchase a commercially available tracker or you can build one yourself. The most common DIY tracker is the Barn Door variety. Let's take a look at how they are built and operate. There are as many varieties of Barn Door trackers as there are people who build them, but they all operate basically the same way. Two pieces, usually wooden boards, are hinged at one end with a single screw type drive shaft, that can be hand operated or motor driven, at the other end. The basic idea of their operation is to attach the camera to a small ball head on the upper board near the hinge, and for the drive shaft to turn one full revolution per minute which, because of the screw action of the shaft, moves the upper board in a shallow arch. The arch movement mimics the movement of the sky.


Internet Photos

There are some relatively precise measurements that must be applied to it's construction, but all of that depends on the design of the unit, and there are numerous designs available online. A basic unit will cost less than $20.00 to build. Even with some enhancements, I have less than $40.00 invested in mine.

Using The Barn Door Tracker:  To use the Barn Door Tracker, it must first be attached to a sturdy Tripod of some type. I use an old equitorial telescope tripod mount from an inexpensive telescope I used to have which works great, but just about any sturdy tripod will work when the tracker is properly secured in place.

It also needs to be aligned with Polaris with some degree of accuracy. The alignment point falls approximately midway between Polaris and the Star just in front of it, known as Yildan, on the Little Dipper's handle and must be on a line that intersects Polaris and the last inside star, of the Big Dippers handle. (See Photo) This offset alignment is known as the North Celestial Pole or NCP. It represents the actual point the north pole points to. Polaris actually rotates around this point as the earth spins. There are other stars near Polaris that can be used to refine the alignment, but for wide angle photographs of limited time say up to 2 minutes or so, this alignment configuration will work very well. Certain times of the year the Big Dippers handle is not easily seen as it sits quite low in the sky, so you can use the last star in the Little Dippers cup as a reference alignment point...just make the connecting line run slightly outside of where it sits.


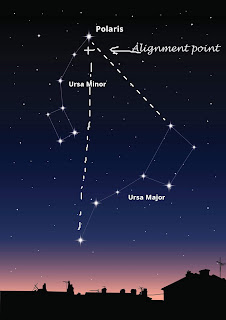
To make the alignment, you must adjust the Tripod in such a way so the Hinge is on the left and is pointing at the indicated alignment point. Some builders use a simple soda straw that is attached to the hinge to aide in the alignment, some use a green laser pointer. On my tracker I attached an old 4X rifle scope to the hinge mounting with a simple bracket. The small scope helps with finding Polaris and the cross hair X helps with precisely pointing it to the correct alignment point. Please note, the relative Alignment point will change through the season as the Big and Little Dipper's rotate across the sky. Sometimes it will be located below Polaris, later in the year it will be above it. It just depends on the seasonal orientation of the Little Dipper.

To operate a basic tracker design, you can simply attach an arm on the drive shaft and rotate it by gently turning it with your finger...Every 15 seconds you simply rotate it 1/4 turn. Over the course of one minute, you will have turned the shaft 1/4 turn 4 times and it will make the required full 360 degree turn. You can make accurate exposures up to several minutes long with this method if you are careful. This works well if you are simply shooting the stars with a relatively wide angle lens. However, should you use a longer focal length lens, a small 1 rpm battery driven electric motor will operate the tracking rotation much more smoothly allowing for more accurate tracking. The motor in effect replaces your turning finger and helps to eliminate possible vibrations caused by that kind of manual rotation. The motor provides a continuous motion, while the manually turned method is stop and go.

Over the course of a couple of years I modified my tracker to use such a motor and also attached a digital voltage regulator that allowed me to precisely control the voltage going to the motor. This helps to insure the tracker is rotating at exactly 1 rpm.


Why Should I Bother With a Tracker:  A tracker allows you to make longer exposures which gathers in more light thus creating a more detailed image. It is also necessary if you want to capture deep sky objects like the Orion Nebula or Andromeda. Without a tracker, doing so becomes much more problematic. I have used upwards to a 500 mm lens. It is about the maximum it can support simply because of the weight, but it does work well. Remember too, you do not always need a lot of magnifying power, bu you do need resolving power and that is where a good quality lens comes in. Also, remember, the larger the lens, the more  critical the alignment becomes and the more critical vibrations become. A 500 mm lens will magnify even the slightest movement of the tripod or tracking devise. The key points are to have the devise properly and accurately aligned and for it to be sturdy.

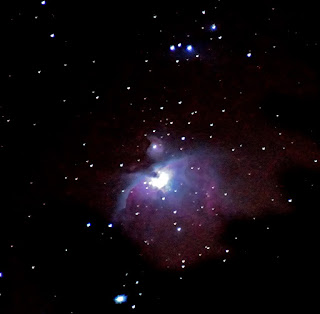
Orion Nebula - 20 Sec Exp - 500mm cropped - f/6.3 ISO 3200
The red color is caused by glowing excited hydrogen atoms and is captured by the digital camera. Even when viewed through a good home telescope not much color will be revealed because our eyes are simply not sensitive enough to discern the subtle nature of the nebula gases. Only in a photograph will the color be seen.
The Results Speak for Themselves:  Using a tracker takes some practice. There is a learning curve and some trial and error involved. But, once you get the hang of it and see that first successful capture using one, the results will astound you. There is a great amount of satisfaction from using a DIY devise that actually works.

There are other ways to capture deep sky objects most of them require you to take a series, at least 100 to 300 shots, of short duration exposures and use a specialize software to 'Stack' them into a finished image. These stacked images include images used to cancel out noise, but the results can be spectacular. However, using Stacking software requires a lot of computer power and they are not always user friendly.

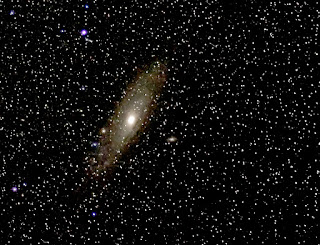
Andromeda Galaxy Tracked exposure
Summing Up: Every season I look forward to once again hearing the buzz of the tracking motor and to watch the tracker doing its thing. Most of all, I look forward to seeing and sharing the results.

Photographing the night sky is a learned skill that virtually any photographer can do with a little practice. I hope this short 3 part series has peaked your interest in this fascinating form of photography. I promise you, once you have tried it, your interest in Astronomy and 'What's Out There' will surely increase.

Friday, July 27, 2018

Breaking Into Astrophotography: Part 2 - Capturing the Milky Way

The wonders of the night sky fill the imagination as far as the expansion of the universe itself. Hidden deceptively out of sight with just a hint of haze indicating anything at all is there, the center of our own galaxy beacons to us to search for it. On a clear dark night, it calls to us to gaze upon its story, and as photographers, we can use simple, everyday photographic equipment to accumulate the light in such a way as to reveal the magical nature of our part of the universe, The Milky Way Galaxy. In Part 2 of Breaking Into Astrophotography, we will take a look at how to capture this wonderful example of the night sky.


There are many misconceptions about photographing the night sky. Many good photographers I have spoken too about the subject often seem to think you need to have a powerful telescope with special built in computerized tracking equipment. Nothing could be further from the truth. The only equipment you need is a digital camera equipped with a wide angle lens and a sturdy tripod. With this simple setup, you can capture the night sky in all of her glory. However, there are a few preliminary things you need to know first before taking full advantage of the opportunity.

What You Need To Know:  The light you are attempting to capture has traveled to us from, in some cases, tens of thousands of light years away, and in other cases over hundreds of thousands and even millions of light years away. A light year of course is the distance light will travel at 186,000 miles per second in one year. That's a long, long ways and multiply that by thousands of years...well you get the idea at just how far away these things are and how faint the light truly is once it arrives.

The Milky Way Galaxy is what is known as a Barred Spiral Galaxy. This means the center of the galaxy resembles a stretched out bar-like area of stars with multiple pinwheel like spirals whirling out and away creating a tumbling wheel like appearance almost like a flat tumble weed spinning in space.


Our solar system which includes our sun and all of the planets resides way out in the suburbs along one of the minor spiral arms...roughly a little over halfway out from the center. We, along with all the planets, orbit around the sun at an incline to the overall plane of the Milky Way. From our vantage point we see the Milky Way edge on, however, because of our orbit around the sun and the seasons, the center of the Milky Way is only visible to us during the summer months in the northern hemisphere. That is because our night sky faces toward the center during those months and away from the center toward the outer edges during the winter months. This is important to know when it comes to photographing the Milky Way for it is during the summer when it is most visible.

Where and When to Find it:  Although the Milky Way is visible beginning in the spring, it is only visible during the very early hours of the morning like 2:00 - 3:00 AMish, and then it will be low over the horizon. The best time to see it at a reasonable hour begins in late June through August with the optimum time being during the month of July. It can be found hovering reasonable early in the evening high in the sky as you look toward the south. It splits between the Constellations Sagittarius and Scorpius.

Goldpaint Images Photo
Camera Equipment:  To be able to capture the Milky you will need a sturdy tripod, any DSLR digital camera along with a wide angle lens, something like 14mm to 18mm. Your kit lens that came with the camera will work just fine. Also, you will most likely want to use a remote cable release because you will be taking long exposures and any movement of the camera will blur your images.

The Setup:  You will want to set your camera exposure on Manual and then set you shutter speed all the way down to the Bulb setting. Technically you can set the shutter to a 30 second exposure as well to accomplish what we are wanting to do. You will want to use the widest angle lens you have and set the aperture setting to it's widest opening...like f/2.8 or f/3.5...depending on the kind of lens you have. You will also want to set your White Balance to Auto and your ISO to something like 800 or 1600 to start with. When it comes focusing, you will put you lens/camera into manual focus mode, and rotate the focus ring all the way out to the infinity setting. When dong this, remember the actual infinity focus point is actually located slighting behind or before you reach the full rotation of the focus ring. So, turn it all the way out, the back it up a just a little to find you lens' best infinity focus.

Point your camera toward the Sagittarius / Scorpius constellations located low in the southern sky and using your cable release, fire off a 30 second exposure. You may want to download a sky tracker APP onto your phone which will help you find your way around the night sky.


You Need A Dark Sky:  In today's world especially if you live east of the Mississippi River you will encounter what is known as light pollution. This is that bubble of light emanating from towns and cities that pollutes the lower regions of the sky, especially near the horizons. Light Pollution can obscure the view of the stars and the Milky Way. To be able to effectively capture the Milky Way, you will need to move away from the city into a dark area several miles away. If you can place the city lights behind you and see the southern horizon without any lights, you will be able to capture better quality images. If  you are fortunate enough to live west of the Mississippi River, you will be able to find adequate dark spaces from which to operate not too far from the city. It might take a bit of creative research on your part to find a suitable location, but it is necessary in order to capture effective photographs of the Night Sky.


Also, you will need a clear, dark, moonless night. The moon is very bright and will fill the night sky with a bright light that will flood your camera and cause a white-out situation when making a long 30 second exposure. Hazy skies will reflect a lot of light pollution as well and will obscure the night sky much the same way a bright moon will.

Composing Your Shots:  Composition is just as important in photographing the night sky as it is in any other type of photography. You will want to line up the Milky Way so it presents a pleasing and interesting night sky story. There are features being captured like what is known as The Dark Horse region which is near the center of the Milky Way that provide a great structural anchor to your photos. Also, by including objects on the ground in your composition, you bring a sense of place and timeliness to the image. Barns, trees, skylines, rock formations, water reflections all make great backdrops. Just remember, there is more to capturing the night sky than simply pointing your camera skyward.

Why a 30 Second Exposure:  A 30 second exposure will be about the maximum amount of time you will be able to use because stars will begin to create long trails after much more time than that. It kind of depends on the type of lens you are using. An 18mm lens will let you easily shoot up to 30 seconds. With a 14mm lens, you might be able to increase it upwards to 40 seconds. But, use 28 or 35mm lens and you will be able to only use about 20 seconds. The longer the focal length of the lens, the more compressed the exposure times become. You can use a star tracking devise which offsets the movement of the stars across your field of view to increase your exposure times. The are several commercial ones available or you can construct an easy to build Barn Door Tracker that works quite well. This will be discussed in Part 3 of this series. However, they are not necessary to capture wonderful images of the night sky.

Post Processing:  Almost every digital photograph can benefit from a post processing tweak or two. Photographs of the night sky are no exceptions and in fact it is probably necessary to apply some post processing to obtain the best results. Post Processing needs to be limited to tweaks to contrast, brightness, and maybe saturation. I would recommend you shoot in the RAW format and/or open your JPG images as a RAW file using Photoshop. From here you can tweak the Exposure value, Blacks, Brightness, Contrast, Clarity, and Saturation, among other things to elevate the image from a nice basic capture into a real eye catcher.


There is a rising trend in the photographic world focused on capturing the wonders of the night sky. By employing simple methods, anyone can join this exciting form of photography. Capturing the night sky and especially the Milky Way is a wonderful extension of your photographic talents. With minimal effort, you can find a dark location and then with a little knowledge of the night sky, you can capture wonderful, eye opening photos. Give it a try sometime. You might discover a new and exciting way to express your photographic desires.