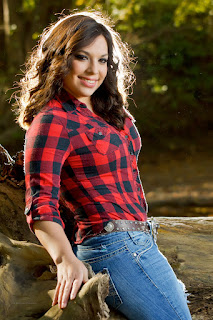
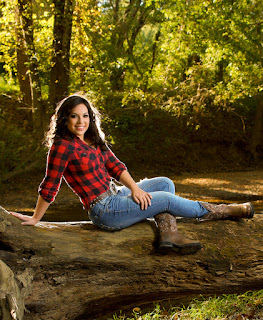
years it helped to stablize the soil along the steep sides of the creek, but now all that remains is a toppled over trunk that is slowly being compromised by the elements of natural decay. It now serves a new purpose, one that adds to the aesthtic value of the scenic view, and one that provides a photographer with an amazing natural prop for a location shoot.
New trees have now sprouted and grown large enough to support the bank and provide a lot of dappled afternnon shade. My photographers eye locked onto the scene within the first few moments of my initial survey. This I knew would be a great place to photograph any model. Problem was the shade, which in many ways is beneficial, but at the same time can cause your images to appear flat and lifeless. What one needs is controled light to add vibrancy to the scene.
We arrived mid-afternoon on a bright and sunny day, however as was expected the tall trees prevented most of the suns rays from penetrating very deeply allowing only a few veins of dappled light. These rays came in handy as they added a measure of natural background light to scene. I setup one speedlight with a 24 x 30 softbox for my main light and one bare speedlight to use as a backlight. The key for the backlight was to generate a separation layer or halo while the main light provided a soft light that brought a flair to the eyes and provided just a kiss of fill light that brought life and vibrance to the face.
 When shooting in a shaded area like this one, you really have to look for ways to highlight your model by using either natural beams of light that cause the hair to glow, or providing your own light to accomplish the same thing. The natural light provides a bit warmer and softer look while the speedlight provides a whiter brighter look. Some photographers prefer natural light exclusively which works well in certain situations, but you tend to have less control over intensity and direction. I've grown fond of using speedlights in the field as they provide a greater measure of control and you can dial up the intensity to fit your desires.
The main reason for a backlight is to separate your model from the background. I tend to dial up the intensity to really make it shine. What happens is you not only get that great hair glow, but it will also provide a subtle glow around the edges of your model to further separate her from the dark background. I don't get overly concerned about ratios between the two, I just go with what looks good to me at the time changing each light's power output according to the need at the moment. I will usually start with 1/4 power for both lights and change one or the other up or down depending on the circumstance. Sometimes I simply move the light closer or farther away to get the desired effect. Keep in mind by using a small softbox like the 24 x 30 one I was using you want to avoid the spotlight effect. Moving the light farther away makes the light source smaller so it tends to look more like a spot light as a result. Moving it in closer makes the relative size of the light larger so it provides a wider wrap around effect. Moving it closer usually requires you to dial the power down a notch or so to keep from blowing out your subject.

With a lovely model and a great location, combined with creative use of the light, well, I'll let the results speak for themselves.


No comments:
Post a Comment