ESTABLISHED 2010 - Beyond The Campfire was created to encourage readers to explore the great outdoors and to observe it close up. Get out and take a hike, go fishing or canoeing, or simply stretch out on a blanket under a summer sky...and take your camera along. We'll talk about combining outdoor activities with photography. We'll look at everything from improving your understanding of the basics of photography to more advanced techniques including things like how to see photographically and capturing the light. We'll explore the night sky, location shoots, using off camera speedlights along with nature and landscape. Grab your camera...strap on your hiking boots...and join me. I think you will enjoy the adventure.

Tuesday, October 10, 2017

Shooting With a Game Plan

On one of my first model location shoots I showed up at the location not having a clue of what I was going to do photographically. "I'll just wing it..." I told myself. The results were, well...predictable. The images looked rather ordinary and snapshotish at best. Winging it can at times produce some wonderful results, but that usually happens only after you apply lessons learned from previous shoots using a game plan. As I continued to develop my location shooting skills it became apparent how having a game plan of what I wanted to accomplish was an important element to help me focus my efforts on a particular theme.

A good photographer friend of mine seems to do this naturally without effort. At times it appears he is winging it, and maybe there is an element of that in his technique, but his approach is one of mentally breaking down the shoot into manageable photographic steps, tweaking the moment just enough until what he is visualizing suddenly appears in front of him and then he captures it. He has a knack for identifying the artistic elements of what is truly there and then being able to bring the moment to life. I've learned a great deal simply observing him as he works.

Shooting with a game plan involves several things. First of all, you must have an instinctive command of your equipment. Being able to know how your camera is going to react to a given lighting situation is key as it gives you the ability to make exposure adjustments on the fly without too much thinking about it. Understanding exposure in general is a must. Always shooting on program mode handicaps your ability to use creative instincts. Also, understanding exposure using artificial lighting...speedlights...is without a doubt one of the most important elements of your game plan. Speedlights give you the ability to control different planes of light at the same time. Understanding how to apply this gives you a powerful advantage. Also, test your equipment. I once did a shoot that required several speedlights where three of them were placed some distance from the camera transmitter. Turned out the transmitter would not reach that far and I struggled to get the shot, initially. However understanding how the lights worked, I was able shift them from being fired directly to being fired as slave units trigger by the flash of another another unit which solved my problem. So understanding your equipment and its limitations is an important aspect of implementing a game plan.


Secondly, having a game plan gives you a place to start. You know from the beginning what you want to accomplish even though the steps to get there may not be readily apparent. Every shoot is different in their dynamics. The lighting is different, the setting, the model, the angles, the energy, in short you the photographer must be able to adapt to your surroundings. Your game plan provides you with an idea, a direction in which to travel. It becomes your shooting roadmap without which it might become easy to get lost or sidetracked. Also, remember the best laid plans do not always go according to the plan, so be willing to adjust your game plan. Even though some of my most successful photographs are the result of having a plan in place, the idea did not always fit the actual live situation.


Thirdly, your game plan should include knowing the location. Ask yourself a few questions. What direction will the light be coming from at any given time of day? Are there shaded areas or high contrast areas? Are there background distractions? Will I need overcast skies or sunny skies? Will this be better late or early in the day? How easy is it to setup...is there a hike involved and if so how do I get my equipment in there? What equipment will I need? What is the most dramatic angle? And, most importantly, what am I trying to accomplish...what will my finished photograph become? I will spend a great deal of time simply searching for locations and then make mental and sometimes physical notes about the location and how it might be used in a shoot. One thing to keep in mind, a game plan will work regardless of the purpose be it a high school senior location shoot, a wedding, or a shoot focused on capturing a single specific type of look or photograph.

Shooting with a game plan helps you to become more efficient in the field. During many of my earliest attempts of shooting a model on location I struggled to find a focused effort and wasted a lot of time. In reality I did not know what I was doing and jumped around trying this and that and ended up with photographs that looked like this and that. During the times I have observed my friend during his shoots, it became apparent at just how efficient he was. Move here, move there, this angle, this lens, this light. He seemed so in command of what he was doing. It is a trait I wish to emulate. Many times I tend to attach a lens and stay with it throughout the shoot when I should have changed lenses a time or two to obtain a different look. Be willing to make strategic changes during your shoot if for no other reason just to see what happens. You can always go back to what you were doing.

A game plan can apply to other types of shooting. Take for instance this photo of a beautifully restored 1976 Corvette in front of the National Corvette Museum. Having a plan in place, knowing the location, using speedlights, then adapting to the situation allowed for a really fun shoot of an iconic car and location.


Lastly, stay within your style of shooting, but experiment with new techniques and styles. Avoid growing stale by not doing the same ole thing the same ole way all the time. All of us can learn from others, but all of us tend to migrate toward a comfortable style. It is perfectly normal to do so, but do not be afraid to try something new...step out on the edge every now and then and spread your photographic wings. That is the only way you will grow.


Having a game plan helps you in so many ways, getting started can often be the most difficult part of the process. To avoid always falling into the I'll wing it trap, start to develop your game plan by saying to yourself, "This is what I want to accomplish...now how do I get there?"...then, go out and do it.


Wednesday, October 4, 2017

Using Light as an Artistic Tool


All of us take light for granted. Even though it surrounds us and permeates our lives with a myriad of flavors
and colors, it seems so common, so ordinary and everyday, we simply choose to overlook its influence. In spite of it being such an important element in our lives, we often look past it simply because it is always there. However, as a photographer Light is the most important element in our craft. I am always conscious of the effects of light even when I am not carrying a camera. I not only see it, I observe it, I watch it closely, I recognize those special moments when by itself, it becomes the subject of what I am looking at. Over the years this awareness of light evolved into a conscious understanding of its nature and how its nature can be used as a photographic tool.

Many years ago I spent a good amount of time developing my artistic flair...I drew pictures of people and places. During that time I did a lot of reading about art and artists and before long it became evident how the great artists understood the use of light...and more importantly how they used the absence of light to create depth and character. In time as my artistic drive shifted more toward photography, this revelation about light has served me well. Light then simply became another tool of an artistic trade.

Light can be used as a tool in many ways; it can be directed, toned down, brightened, softened, blended, recolored, and used from different directions at the same time. It can create shadows to create character. It can be directed to fill in the small spaces where not enough light exists or it can be blocked to create a darker moodier tone. It can bring life to an otherwise dull composition. It can be accumulated or subtracted. In short, light is perhaps your most important and versatile photographic tool simply because it is so versatile.

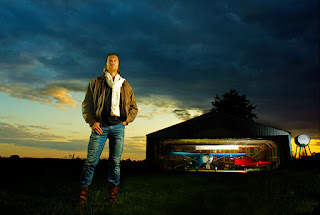
Take this photograph I call The Pilot. Several phases and planes of light were used in creating this image. The ambient background light, all natural in its flavor, created the overall mood of the image. From that, I added some fill lights to illuminate the airplane hanger and the pilot.


All three of these light planes were of different intensities, yet when blended together the impression of the light creates an interesting result. Light then was used to sculpt the final image and bring to life three separate compositional elements; the hanger with the airplanes, the background sky setting, and the pilot. Light became the chisel used to carve out the depth and character of the portrait.

Light is unique in that it alone can create shadows or it can provide full illumination. By changing the angle and the direction of the light along with its intensity, you can create soft or harsh shadows or highlights. Depending on the mood of the image, light is used as element connectors to bring the composition together not unlike nails or screws are used to connect separate pieces of materials.

There are times we can take light and use it to create order within what might otherwise be an ordinary composition. Flat and dull light will often create a flat and dull image that exhibits no real quality, only a sense of chaotic jumbleness. But, throw on some extra light, change its angle, and alter its intensity above or below the ambient light, and you can isolate what is truly important and separate it from the chaos of what surrounds it.


When attempting to build an interesting composition, regardless of what it is, the first thing I evaluate is the light. Even if all the elements line up correctly but the light is wrong, it just will not work. But, when you approach your photography using the idea that light is another tool you can use to build your image, it changes how you visualize your final image. Light is a powerful tool and when used creatively helps you to build not only amazing images, but a powerful vision.


Thursday, September 28, 2017

Musical Waters


Rest alone is not always enough of what we need to recover from the challenges life throws at us. Sometimes we need more, something richer, something deeper, something that helps us rediscover who we are, a place to go for repairs to damages hidden inside. As life catches up with us, we look for a special moment to help us along, something subtlety powerful to carry us a bit further down the path toward recovery. Anxious moments, uncertainty, bruised emotions, sometimes a claustrophobic feeling of being trapped with few escape options can weigh like a fearsome burden on a mind and body and cause us to withdraw dwindling emotional funds from our inner bank.

No one is immune from such things. As sleep resisted me and simple resting fell well short of what was required to remove the ghostly fatigue that hovered over me, my soul cried for something more, so...I went fishing.


The late September day proved unseasonably warm with mid-day Indian Summer temperatures hovering near 90 degrees. The first hints of fall tossed out their clues of what will come with a splash of color here and there.  A cobalt blue sky spread its wrap above the landscape and a few summer clouds suspended themselves like patches of white sewn onto the outside of a new blue dress. I slipped into the parking area just off the road...no other vehicles, good, I was alone, with no camera, just my small collection of spinners, fishing rod, and the musical waters of Trammel Creek.

At first I just stood next to the waters edge taking in the clean air and listening to the song of the creek. The first step I made into the cold waters quickly filled my old tenny's and sent a chill through me but it was a refreshing reprisal from the warmth of the day. Flowing clear and clean around my legs the current spun and rolled its way down stream in its perpetual motion, twisting and swirling, seemingly happy with its purpose in life as it flowed around obstacles. I wished I could as easily flow around obstacles. As the first cast was signaled by the whirl of the fishing line and a gentle plop of the lure next to a stretch of deeper water, I sighed in relief asking myself where the summer had gone.

Moving here and then there, casting across and through the waters I lost myself amongst the luxury of fishing, not caring if, not even anticipating the strike of a trout. I was simply being there away from everything else, at least for a while. It was a fine and pleasant moment, almost dream like, listening to the lively song of the waters as they careened and cheered, before tumbling over the shallows with a sparkle of reflected light to fill the deeper pools in a choreographed chaos.

Time easily loses itself like a drifting fog around musical waters, and so it was on this day. With dozens of casts tossed into slow moving pools or across faster moving swirls, time indeed seemed insignificant and a full hour passed with barely a notice. During a long wade down stream to that 'other fishy spot', I saw them, the trout, swimming lazily in their blissful home pools, yet they seemed unaware of and certainly less interested in what I offered to them as bait. Didn't matter...just knowing they were there was reward enough.


Eventually, I returned upstream and found a small grassy clump where I could sit in the cool of a shade. Ten yards to either side of me flowed a crystal clear set of riffles keeping time with the sounds of the day. Overhead a majestic hawk surveyed the fields, banking and gliding with little or no effort. With barely a flap he caught a rising air current and soared up and over the ridge dominating the western edge of the creek, and was gone. Down stream there was a chatter, a blur of movement, then a splash. I turned to see ole Mr. Kingfisher launch himself back into the air, this time carrying a meal in his beak.

The fishing was slow, so as I sat in the shade, I lowered the rod and simply listened to the natural quiet. Sometimes we need quiet in our day as a counter balance to all the cluttering noise that infiltrates our lives. Sometimes quiet is uncomfortable, at first, because our usual daily thoughts and actions tend to become inflamed by all the rhetoric and nonsensical kinds of noise we allow to distract us, so much so to where quietness seems foreign. All that noise and clutter causes us to deplete the value of who we are and we often find outselves poor of spirit and even poor of hope as a result. Yet, quiet is what we need more often than we allow for ourselves. How easily we forget.

Quiet and stillness is a powerful healer of the sorrowful anxieties that draw us ever closer to the edge of depression. We resist such things, being drawn into emotional states that hold us down, even so, on this day, I gladly allowed my thoughts to find comfort from the song played by the musical waters of this little dancing brook. In the process I became a musical waters millionaire, refreshed, ready to rejoin the world again, at least for a while.

Like the old Jeep, I still need a few more repairs, yet, the more-than-rest I searched for spoke clearly to me on this day when the fishing was slow, because as I have previously discovered and what was once again made abundantly clear...musical waters offer so much more...than catching fish.

Tuesday, September 26, 2017

Portrait Studies: Creating a Character Portrait

The world is full of characters and we who live in Kentucky have our fair share of them. Some are a bit rough around the edges, some are the salt of the earth, while others...well, lets just say they are bit more or less rough in their character ways. As a photographer, they all make great portrait studies, for they do come in all shapes and sizes and demeanor's.


This past few years I've been shifting my photographic efforts in a different direction...I've been doing more location shoots with more Characters...actually a better definition would be Situational Characters. What I mean by this is to shoot different situations using someone like a cowboy and his horse, or a biker and his Harley, or a farmer and his tractor, a homeless man sitting on a bench, and even a fireman and his fire truck, or as I recently accomplished, a pilot and his airplane.

The idea I keep tossing around is to find as many situations as I can and setup an interesting location along with dramatic lighting. Finding a willing Character model is only part of the problem...possibly even the most difficult part of the equation. Capturing them photographically boils down to following your creative instincts and patience. To accomplish this you have to be not only a photographer, but a weatherman, a choreographer, a salesman, a geographer, an historian, a magician, and also an optimist who keeps his fingers crossed hoping it all falls together. In essence, you must become a multi-dimentional character yourself.


Creating a character portrait demands you effectively blend your character with the light and location. Location is just as important as light and sometimes can require a great deal of leg work to find. How you compose the image depends on the location because you want to include in the background the supporting elements that enhance the moment. Angles are critical for the shooting angle can make or break the portrait. Not every portrait should be shot from eye level. How you make the exposure depends on the ambient light where dark skies can create drama and mystery, or colorful backlighting can set the moment in its proper place. Creative use of the white balance setting can dramtically alter the look of the image. Adding that creative flair also requires you to master the use of off-camera speedlights. Having it all come together at the same time requires the use of sorcery.

The idea on creating a character portrait is to shoot for one single image. It may require many photographs and a lot of trial and error, but the idea is not to do a typical high school senior location shoot where you take and provide a bunch of photos. The idea is to visualize what you want to accomplish, create the setting, add the accent light, throw in some dramatic lighting, and hope your character stays in character during the shoot. The result can often be stunning.


Monday, September 18, 2017

Photographing the Athletic Body

I have for quite some time been a strong advocate for diversifying photography skills. What I mean by this is to be willing to try different types of photography, cross training as I call it. I cut my teeth on nature and landscape photography and I still consider this to be my primary roll. However, I have learned just how important it is to try new and exciting types of photography including portraits, both in the studio and on location, astrophotography, a little sports or action, still life, incorporating flash or speedlights in what I do, and even a little video from time to time. This diversity I do believe has made me a stronger, more rounded photographer mainly because I have avoided falling into a rut , or stated another way, always doing the same ole thing the same ole way.

Some types of photography can be further broken down into separate sub-types, like portraits. I have fallen in love with shooting portraits, especially location shoots. By doing so it has forced me to learn how to use artificial lights to a greater extent than I even realized was possible. Using speedlights on location has opened up an almost limitless array of possibilities by allowing complete control of the lighting. This alone has parlayed into trying other sub-applications. One such application is photographing the athletic body.

Due to budget restraints I recently constructed a pair of DIY strip lights. Strip lights are a tremendously useful lighting tool allowing you the photographer a wide range of lighting capabilities. They are long relatively narrow light boxes that provide a linear light angle making it possible to photograph the body with highlights along the length of the athletic body helping to define and separate the body from the background.

It also helps to have a son, Christopher, who is rather athletic and willing to pose as a model from time to time, so it was only natural to try these lights with him. So here is the setup.

First of all the shot was taken outdoors late in the afternoon and not in a studio. The late afternoon light was still realitively bright, but I wanted him framed against a black background. To make this work, I had to kill the ambient light with my exposure. On manual mode I set the shutter to 1/125, the ISO to 100, and the aperture to f/5.6, just to see what would happen. As it turned out, the ambient light all but disolved and the background became virtually black.

Next, I set the two strip lights slightly behind and to either side of Christopher. This effectively provided a rim light that created a nice outlining exposure along his arms and sides. It also provided a cross light that helped to define his muscle groups.

The thrid light came from a 32 inch octobox placed on a C-stand and elevated to where it was slightly in front and slightly to one side. The octobox provided a nice downward flow of light that created the muscle defining shadows so important for capturing the athletic body.

After the initial setup, it was just a matter of getting the power settings on the lights adjusted to provide the proper exposure values. Many photographers will use light meters and worry about lighting ratios between the key light and the accent lights. That is all fine and good, but I simply use the instinctive method of trial and error...when it looks right it is right regardless of what the ratios are.

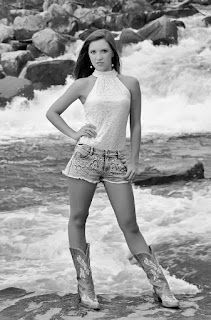
You do not always have to use strip lighting to capture the athletic body. Sometimes a simple bare speedlight or two will do the job. In this next image, that is exactly what I did.


I used two speedlights, one set behind and to the left of the young lady athlete and one set in front and to one side. This shot was made during a special photography outing with several other photographers and models. On this particular shot there was a black backdrop, provided by another photographer, setup behind our model. All I did was move the lights around and snap the shutter allowing the motion freezing aspect of the speedlights to do their job.

The athletic body is certainly an interesting and exciting subject to photograph. Using speedlights, strip lights, or whatever suits your situation can transform you images into works of art. Also photographing the athletic body is a great way to learn about lighting angles. Like an artist who draws the human body to learn about its form, shape, how light flows across it, and positioning, photographing the athletic body helps the photographer better understand how to apply light to almost any given portrait situation. It also serves as a great learning tool or proving tool as to how to apply off camera lighting to your portraits.


Wednesday, September 6, 2017

The Power of Light - Turning 4 Speedlights Into 8 or 10 or 12...

I am continually amazed at the versatility of what is possibly the most mis-understood component of photography; The Speedlight. The more I use them, the more amazed I become. Compared to studio lights, speedlights are relatively low in power, however they possess a huge advantage over their more powerful siblings. That would be portability, and although not as powerful, they provide enough lighting capability to handle most jobs. About the only real limiting factor they have is their cost. A name brand speedlight can often cost four, five, or six hundred dollars for one unit depending on the model. If you are like me, well, I can't afford those kinds of prices.


 In recent years some very good lower cost units have shown up on the market. Godox, Neewer, Youngno, just to name a few offer very good speedlights at reasonable prices and they work quite well. I was able to purchase four Godox flash units complete with remote transmitters and receivers for about the price of one high end name brand speedlight. Even so, four lights stretch my budget out about as far as I can take it.

Even with four flashes, I've run across situations where five, or six, or even eight flashes would have been desirable. I usually end up having to make due with what I have and the results sometimes fall a bit short. That got me to thinking about how I might be able to more effectively use the four units. After some thought and watching a few videos, it finally dawned on me that under certain situations, I could easily turn those four units into eight. It's all a matter of combining several images into one to obtain the desired results. Let's take a look at how this works.

Under normal shooting situations you would probably not have the time nor the need to follow this process and this is not HDR (Hi Def Res). To use this process you must be trying to accomplish a single task, or put another way, to come up with a single photograph and not try to capture a lot of different images. The idea then is to think out ahead of time what kind of image you are wanting capture, and then plan your shoot in such a way as to have a good idea of what you want the finished photo to look like. It takes a bit of planning and pre-knowledge of how speedlights work and some PhotoShop skills come into play as well, but they are relatively straight forward.

Let's look at how this photo was accomplished. It is a photo taken of a pilot and his airplanes at sundown. The nature of the natural light dictated that several speedlights would be required to get the desired results. What I wanted to do was to have his two airplanes sitting in the hanger with a Kentucky sunset in the background. I also wanted the pilot to be up front and center...it's really a portrait of the pilot, with the airplanes in a supporting role. The background and general setting  was used to simply establish a point of reference and add interest.

There were several planes of light used in this shot, each with a different required exposure value. The first plane of light was the background sunset with the pilot in the foreground. The second plane was just the background and a third plane was the hanger with the airplanes inside. I did add a 4th plane, but it was a simple lighting of the fuel container standing next to the hanger.

So the basic process was this; I took several photo's of the sunset and pilot using two strip lights so as to provide light along the full length of the model. The exposure was set for the background, and the striplights were added to fill in the light on the pilot. This image then became the base line image, the one upon which the others would be built. Once I had the sunset composition established, the camera was then locked down and was not to be move again during the shoot. Focus and exposure values were set to manual and would not be changed during the rest of the shooting.


With the hanger composed against the background, the inside of the hanger became very dark. As a result the hanger and airplanes inside were not visible. What was required was to provide some illumination to the inside of the hanger, and to the airplanes themselves. To setup the second plane of light, I set three speedlights low inside the back of the hanger. On two of the lights were orange and yellow gels which were added to provide a bit of color to the back of the hanger and to also tie it in with the sunset. One light was left bare, mostly to provide some simple fill light. I took several shots with this configuration. Of course by this time the sky had become darker, but that was okay...you'll see why later.


As an added note I ran into trouble while performing this setup and exposure. The lights were a good distance away from the transmitter sitting on my camera which resulted in a weak signal on the receiver end causing the lights to not fire like they should have. Sometimes one woudl fire, but the other two would not. What I ended up doing was setting two of the lights to Slave Mode, and allowed the one light that was firing to trigger the other two with its flash. I also had to move them closer to the front of the hanger...those few yards seemed to help. This effectively solved my firing problem, however we lost a lot of time and experimenting opportunities because of the delay.

Once I had a satisfactory image of inside the hanger and airplanes, I captured a simple shot using one flash pointing at the fuel tank alongside the hanger.

Once I had all of these photo's taken, the next step was to blend them all into a single photo. This was done using PhotoShop Elements. First of all I had to create a base image by combining the two sunset images into one. This allowed me to erase the strip lights out of the image and to expose the background image behind them thus giving me a single image of the sky and the pilot without the lights showing.

I then opened the hanger picture and tweaked it slightly to bring out the details I wanted. This sky background photo was them copied and pasted onto this hanger photo. Using the eraser tool, I began to remove the the darkened out hanger exposing the lighted airplanes that resided on the layer underneath. Once I had accomplished this, I flattened the image to merge it into a new single image.

Then I opened the last plane of light and tweaked it much the same way as the previous one bringing the fuel tank into view. Finally after some overall tweaking I flattened the entire image and saved it.


Overall I was pleased with the results...I feel I can do a better job as this particular image still needs some work, and maybe someday if our pilot wants to give it a try, we'll do another session. The delay caused by the malfunctioning trigger cost me too much in being able to really do all the more subtle photographic techniques I wanted to try...in reality I became frustrated and failed to focus on the things I should have. Regardless, we had a good time, I learned something new, and ended up with a pretty good photo.

Tuesday, August 22, 2017

The Longest Day

Every once and a while I will share a story or two about my time in U.S. Coast Guard usually after a moment of reflection about how something that happens today reminds me of an event from all those years ago. So it has been recently.

The last few days have been rather exciting and at the same time extremely tiring. The big eclipse of 2017 passed thru this part of Kentucky and as a result thousands of people from all parts converged on this area to capture a glimpse of the great solar eclipse. Many of them arrived a day or two early and as a result they were looking for something to do...so...a great many of them visited the National Corvette Museum where I work part time taking fun pictures for those who attend. It was so busy the past few days that I found myself absolutely exhausted, so much so today after work I crawled into bed and crashed for a couple of hours after I got home. Oddly enough the exhaustion I experienced reminded me of another event that happened over 40 years ago when I experience one of the most exhausting stretches of my life. I call it The Longest Day.


Back in the summer of 1974 I was stationed at the U.S. Coast Guard station Umpqua River on the Oregon coast. We performed many duties but our primary roll was search and rescue. As part of that roll some of us had the opportunity (pun intended) to stand what we called the Tower Watch. Actually it was a vital function as the Tower Watch were the eyes and ears of the station where those in the lookout tower, a small building positioned along the edge of the ridge that overlooked the Umpqua River Bar, were responsible for 24/7 every day of the year to monitor boating traffic in and out of the Umpqua River crossing. This also included maintaining a Communications watch where we monitored emergency radio frequencies. This watch was rotated every 4 hours and during each week you could stand the morning, mid, or evening watches.  We also had our daily work assignments along with the watches.

During one summer week I was assigned the first 4 to 8 watch which meant I had to get up very early, usually after not much sleep, and then turn to work on our daily work schedule right after getting off watch at 8 that morning, and then return again at 4pm for the evening watch. I was also what was known as the duty Seaman which meant if any kind of rescue situation was required when I was off watch I had to head out as one of the boat crew.

The Longest Day began with my ordinary morning and evening watch. The day before had been a long day and night so I was already tired having been up for most of the previous two days with virtually no sleep, an hour here and there. Around 10pm I was about ready to turn in for the night when we received a call from one of the commercial fishing trawlers that they had stumbled onto a cabin cruiser drifting about 15 miles off shore. Somehow or another they had a power failure and were unable to start their engine or radio for help. As luck would have it, myself and two other crew members headed out to bring them in. Seemed like a routine Search And Rescue, but it turned out to be anything but that.


The night air and the ocean were rather calm, so much so they both seemed surreal as we cut through the waters. On the surface was a thick layer of fog that obscured our visibility, but overhead we could see stars. As we powered our way toward the rendezvous with the cruiser, the propellers from our motor lifeboat stirred up that phosphorescent algae that began to glow pale green from the agitation. I was fascinated by this observation as you could follow the trail behind us far enough until it disappeared into the fog.

Several times along the way we had to take a radio direction signal to alter our course and as I also operated the radar unit I would from time to time take a quick look, adjusting the signal strength to reach out far enough where we would eventually see them. It took us a little while to reach them, but eventually we did and we took the cabin cruise in tow...thanking the crew of the trawler for their assistance.

At that point it appeared we were on our way back to finish up a routine run. When towing another vessel, you must slow down because each hull type has a maximum towing speed. If you go too fast you could cause the vessel in tow to broach and potentially capsize. You also want to let out enough tow line so the two boats are in sync with each other, with both of you rising or falling across a swell at the same time. So we backed off the throttle, let out about 150 feet of tow line and puttered our way toward home. It was going to take about twice as long to get home as it took to get out there. I tried to catch some sleep but it proved to be impossible under the circumstances.

The return trip became one of sitting back and monitoring systems and because I also handled all the lines, I would from time to time check on the towing houser just to make sure all was well. The fog was so thick our vessel in tow at times disappeared into the void of the fog. When were about half way home, our boat coxswain, Myron Dale, asked me to check the radar and get a visual fix on where the Umpqua River entrance Bar was located in relationship to where we were.

I switched the radar back on, peered into the hood and adjusted the power setting. For a brief moment I could see the beach area and the jetties about 7 or 8 miles away...then, the radar went black. I tried to readjust the settings, but nothing on the screen. I turned it off and back on...still nothing.

"uh...Myron...We gotta problem here," I said in a rather confused voice.

"What do you mean a problem?"

"I mean the radar is dead. There is nothing on the screen."

Myron and I exchanged places for a few moments. I operated the boat while he fiddled with the radar.

"Crap...it's dead." He grumbled.

"Yeah...that's what I said." I smarted off.

Myron jumped back on the coxswains chair and tried to use the radio direction finder to lock onto the radio beacon coming from the Umpqua River Lighthouse. It was dead.

"What the h--- is going on?" he again grumbled.

About this time our engineer, Dan Mckean, got into the act and went below to check on circuit breakers and fuses and things like that. They were all in good order.

Myron then tried to call the Umpqua River Lookout tower on the radio. Nothing...not even static. It was dead. It appeared almost everything electrical was dead and we were running blind on a foggy night with a vessel in tow. The only thing working was the depth finder. At the time we could not figure out why it worked but nothing else would. It turned out to be our ticket home. (Later we discovered that one of the two motor generators had burned out. The burned out generator supplied power to everything electrical except the depth finder.)

The problem we faced was in order to cross the Umpqua River Bar, you had a rather narrow section thru which to cross. Too far to the south and you would end up running into the jagged rocks of the jetty. Too far to the north and you might run aground in shallow water, not to mention the possibility of a breaker line forming across the bar. The radar would help us see that as intermitent lines running between the jetties. Difficult enough even for our surfboat which was designed for such things, but having another boat in tow complicated the situation.

Myron was pretty cool and experienced. With the depth finder working he simply said, "Okay, we'll run straight in until we reach the fathom line where we know the end of the south jetty ends. From there we will run north until we see the end of the jetty, then loop around and cut across the bar."

Sounded simple enough, but the fog had reduced visibilty to about 50 feet by this time.

Myron shouted at me to take in some of the tow line so we could better see our tow, which I did. As we approached the correct fathom line, he backed off the throttle to where we were barely moving forward. Dan climbed out onto the bow of our boat and I stood down in the well near the rear compartment. We listened for waves rolling up on the jetty and strained to catch a visual confirmation. In the distance we could hear the waves rolling onto the rocks, but could not see it. Myron, crawled us forward and all three of us strained into the foggy night. Then, about 50 feet away, the end of the jetty came into view.

Myron back down on the throttle, and shouted "Watch that tow line!"

I jumped over to the towing head and quickly took up the slack to avoid the line from going too slack. A slack line could have fouled our props and we would have been in real trouble if that happened.

Myron spun the large wheel and touched the throttles forward just a bit and we arched our way around the end of the jetty eventually turning into the channel. After a quarter mile or so, the fog lifted and we could for the first time in some time breath a bit easier.

It took another hour or so to bring our tow all the way in to the harbor, get her secured, fill out the SAR reports and get all the information we needed to call it a night. By this time it was approaching 3 am While we were performing this, the skipper of the cruiser asked me why we had come so close to the jetty on our way in. I smiled and said,

 "Oh we lost all of out electrical power and were running blind in that fog. We had to cut it little close."

I looked the skipper in the eye and in the faint light of the harbor I could the see the color drain from his face as he began to realize just how serious of a situation we had been in.

My night was not over though. By this time I had been up for over 60 hours and just undergone a stressful ordeal that ran late into the night, but once we got back to the station, I had to prepare to go on watch again for the 4am to 8am morning watch. I was dead tired, but managed to stagger through that watch. By 8 am when I returned to the station I was so tired it was all I could do to grab a bite to eat.

Friday's most of the time we were granted early liberty after lunch, but on this day we were not. Too much going on, so I ended up having to work for most of the afternoon...still with no sleep. I lost track of how many hours I had been functioning, but when we were finally released, I simply fell into my bunk, clothes and all, and fell off to sleep. Luckily I had the weekend off and I estimate that I slept for about 18 to 20 hours before getting up the next day...the day after the Longest Day.


Wednesday, August 16, 2017

Where Were You In '62

The music is what I remember most, lively songs filled with story telling lyrics about the emotions of young
teenage love. It was music that defined an era, an era when the hot rod came of age along with a generation of searching youth. I was just ten years old, but I do remember the times, the songs, the look, the feel of the day. It was a time when I first began to notice the power and boldness of the muscle cars and can remember the distinctive styling family cars possessed back then.


In 1962...I was there filled with fascination and wonder of what life was like back in the day when cruising the main drag with the AM radio blaring away was the boss thing to do. Gasoline prices hovered around 30 cents a gallon back then and a person could cruise all night on a couple dollars of gas. Even today every time I hear the music again, the melodies of those magical songs cast a spell across my memories.


It was a time when one of the greatest high school basketball teams I've ever witnessed played their games to a rousing crowd. The Eagles of Hobbs, New Mexico where my dad was a journalism teacher and yearbook sponsor. I was able to attend most of the home games because he would be there taking pictures of the games for the school. That first year if memory serves me right, the Eagles averaged over 100 points a game...and this was long before the shot clock and three point shot became the norm. Man they were good...full court press the whole game and often scored 20+ points before the other team made their first basket. They were coached by the legendary Ralph Tasker, one of the winningest high school coaches of all time. It was great fun and created wonderful memories...back then in 1962.

Down the street from our small but comfortable home a young married couple pulled into their driveway one day with a brand new classic black 1963, split window Corvette. Within 5 minutes we were all down there hovering over it. It was my first taste of what owning a muscle car could mean. From that moment on I relished the thought of cruising the main drag and could not wait until I could drive.


Oddly enough, a few short years later, that is exactly what I and most of the high school kids did on Friday nights after the football game. It was another town in another state, Okmulgee, Oklahoma, but on Friday nights the main drag turned into cruise city and during the cool of the summer nights cars of all shapes and sizes could be seen cruising Wood Drive along with the inevitable drag race between stop lights.


 In 1974 when the classic movie American Graffiti came out, I was surprised at just how much it resembled our Friday nights. In our fair city you could find one of the best technical schools in the country, the technical branch of Oklahoma State University where future auto mechanics were taught their trade. Because of that it wasn't unusual to see jacked up hot rods cruise the streets, some as classic as the American Graffiti cars.


The decade between 1962 and 1972 saw America change. Those of us who lived through that decade remember well the sometimes tumultuous and often revealing shift in society. Even so, we can also remember with fondness the classic cars, the lights, the music, the sounds, the flavor of the times. Wherever I was in 1962 remains locked into my memories with great affection. When a classic tune triggers a certain memory, when a classic car jump starts the old rumblings to cruise the main drag, when I stop just long enough from my often dull routine to remember those times, well those are memories well worth hanging on to and well worth recalling. 


Tuesday, August 8, 2017

The "Color Effect" - Using Color to Affect The Photographic Mood

Color plays an important role in the mood of a photograph. Deliberate uses of the color spectrum can heighten the specific effect you are wanting to portray, but sometimes by default, how you use color will generate a variety of moods. Lets take a look at three basic colors, Red, Blue, and Green, and see how they affect the mood of a photograph.

Red along with its variations of orange and yellow, denotes passion and aggressiveness, or playful and energetic, and sometimes happy and friendly. When used in a photograph red variations can be used to bring attention to a specific area, or shake up the composition. Red variation in an image can bring life to what might otherwise be an ordinary composition.

Blue, on the other hand, denotes trust and serenity, along with a calmness not always found in other colors. Depending on if you use a light blue or a darker shade, blue can bring a refreshing energetic element and liveliness to an image. Using a blue gel on a speedlight setup in the corner of a room can cast a cheery flavor across the room when used as a subtle accent.

Green then denotes stability and a natural state. One feels comfortable and at home with shades of green and it acts like a counter balance to bolder colors that may be found in the composition. It softens the impact of the image.

In the photograph of the National Corvette Museum full moon image above there are two basic colors with an orange shade of red along with blue as the primary colors. The contrast between the two bring an element of power and purpose to the image with the power of the reddish light bringing attention to the Sky Dome and the blue of the sky bringing a calm serenity to the image. Although they are different colors, the vibration they create seems to work well here.


This next image uses a combination of light blues and greens along with some yellow and orange accents. The prevailing green color provides a level of serenity to the scene where the contrasts of yellow and orange brings a powerful message that comes with the change of seasons. Yellow is simply an interim color between red and green and so it blends the two traits into a mood where the viewer senses not only the subtle calmness of the location but the more aggressive strength of the moment. The viewer at once wants to both be there and also feels at home at the same time.


Even indoors when using artificial light, color becomes an important consideration creating a photograph with impact. The picture of the young lady in the flowered light blue dress used a mix of artificial lighting to achieve some of the same effects we've discussed so far. Along with a front facing softbox to illuminate the model, a single speedlight with a blue gel attached was fired from the corner on the right to throw a subtle blue cast across the scene. Primarily it was used to bring a cheeriness to the room by filling the room with a pale blue tint that reflected off the many shiny surfaces and to help accent the blue dress. It also provided a trusting calmness to the scene. In the background another speedlight with a reddish orange gel was fired into a dark corner to bring life and attention to the depth of the room. It also served to contrast with the blue to warm up the mood with a more aggressive flavor.


The last image is from the banner page of this blog site. It contains a powerful aggressive message designed to capture the attention of visitors to the site. The bold reds, oranges, and yellows overpower the image to such a degree one hardly notices the more subtle bluish gray horizon line and the subtle green hue of the field of coneflowers. It does exactly what it was intended to do; generate an emotional response in the viewer to such a degree they want to see more. One can feel the movement in this image almost as though this image might be a single frame from a powerful introductory video.


Lighting, regardless if natural light or artificial light, is not necessarily always something that must be precisely measured. In many cases if not most of them, catching the light just right is instinctive and intuitive at the same time. It also requires some experimentation. I go by the adage of it's right when it looks right and I don't always over work the process, don't always rely on the histogram or the exposure meter. The in-camera metering is simply a tool I use to get a ball park beginning exposure setting. From there I compensate the exposure up or down and adjust the lighting until I get the desired look. When it looks right...I know it...and sometimes right doesn't always mesh with what the book says it should be.


Color then can be used to bring a specific kind of life to your images. By watching for and using the colors of found in nature, then enhancing them through exposure and composition, one can generate visual moods to such a degree, the viewer may not even realize they are being inspired by what they see. Photography is all about light for a great many reasons, not the least of which is because the colors of light are what generate the mood of your photograph. You should always desire more from your camera than a simple xerox copy image of what you see. Understanding and knowing how to capture and use those colors effectively is key to creating images with a powerful impact.

Saturday, August 5, 2017

Filling in The Blanks with Accent Lights - Lighting a Classic Location

The Corvette Cafe is a classic setting with a nostalgic look and feel to it. When given an opportunity for a model shoot in such a location figuring out how to light it is vital to obtaining the desired results. When combined with a time limit of 30 minutes to complete the shoot, well one must work quickly and effectively to be able to identify those key areas that need a bit more light, a sort of filling in the blanks approach.

The key to good accent lighting is to make it appear natural. What you do not want is to make your lighting look like a bunch of harsh flash cubes have gone off. So, let's take a look at how the lighting on this photograph was setup.


First of all the natural light streaming into and across the room looked pretty good to the eye, but taking a quick photo using the natural ambient light revealed just how dark it really was, especially back in the corners and behind the counter. Way too many shadows and bright spots scattered here and there that made a natural light photo look flat and empty. The room required some help to lift the light where it look natural and exciting. To make it work, I had to strategically place 4 speedlights around the room to provide colorful accents.

The main light was fitted to a 20 x 30 softbox and was situated so it would cast a natural looking light across the front of the model. I set the speedlight to a wide area setting and powered it up to around 1/2 power. This helped to enhance the natural light filtering in from the large windows by the entrance and gave a look to the room where it appeared a strong outside source of light was filtering through.

The main counter possessed a wonderful shiny brushed chrome patina which included the bar stool chairs. There was also a good splattering of red painted walls and the bar stool padding was also colored red which added an exciting vintage look to  the scene. In the far back corner was a recessed booth with a single soft incandescent light hanging from the ceiling. This area proved to be rather dark, so I added a speedlight angled upward to fill in that dark area. A reddish gel was added to provide a splash of color in the background and to help tie in with the red seats and painted walls and to provide a bit of color vibration.

Cafe Shoot Lighting Layout


In order to highlight the chrome and shiny surface of the counter I placed another speedlight to the right and attached a blue gel which cast a wonderfully cheerful bluish tint across the room. This bluish tint was caught and reflected by the chrome and also complimented the models dress which caught a hint of blue across the back edge providing a subtle separation from the background. Her white lacy hat also caught some of that blue light which helped it to contrast and stand out as an interesting compositional element.

The room seemd to vibrate more with the hint of blue light as compared with a more normal white daylight. A fourth ungelled light was placed well off camera to the right and simply angled straight up to fire against the ceiling and add a bit more ambient light across the room. All of these accent lights were powered down to between 1/16th and 1/4 power to provide just a enough light to do the job. Some experimentation was required to find the right combination for each light.

The exciting checkered flag floor added a wonderful balance to the scene and reflected bits and pieces of all the lighting. The area behind the counter remained a bit dark, but all the shiny surfaces caught and reflected enough of the extra light to fill it in enough to allow it to become more visable.

Compositionally, the angle of the shot was critical and the high angle used was simply a spur of the moment attempt to try a different look...to take the image farther down the compositional path. The checkerboard floor and wide angle lens skewed the look just enough to make it appear like leading lines directing the eye into and across the image. In reality, the checkerboard floor is what made the shot, yet it does so naturally and without overpowering the image. It simply looks like it belongs which is what it should do.

So, lighting a scene like this one requires the ability to see the corners, recognize the potential of what is there, and then enhance the natural flavor just enough to give the composition a powerful yet subtle appearance by filling in the blanks with effective accent lights.

Thursday, August 3, 2017

The Quick Shoot - When "Classic" Was Lived (Part 2)

The Corvette Cafe at the National Corvette Museum retains a nostalgic flavor which returns one to the glory days of the 50's diner experience. When the opportunity presented itself to do a model shoot inside this iconic looking location, there was nothing else I could do but accept.


As part two of the Quick Shoot post lets take a look at how we pulled off an exciting throw back photo shoot staged inside this classic looking venue.


One of the prevailing visual elements inside the diner is all the chrome that sparkles like crystal when light falls across the fixtures. As part of the shoot, I wanted to capture this look, but I also wanted to take advantage of the reflective properties one can find inside the cafe. I decided to use 4 lights. One main light with a 20 x 30 softbox used mostly as fill light on our model, again the lovely Katie. I used two gelled lights, one with a red filter and one with a blue filter. These gelled lights were primarily used as background lights to bring interest and color to the dark corner areas. The blue light provided a crisp clean look and was used in some of the shots to enhance the overall contrast against the red background light and to also create some nice reflections off the chrome fixtures. I used a fourth light simply set way in the back and pointed straight up as a bounce light against the lighter color of the ceiling. This provided a brighter ambient light to the overall image.


Again we only had 30 minutes to complete our shoot so we had to work fast. The first setup was to use one of the corner free standing tables and two high chairs. The blue gelled light was placed outside just off the corner of the cafe and pointed through a window so its light would fall across the wall. The red gelled light was placed in the opposite position inside and pointed to illuminate the other side of the wall. My main light with the softbox was positioned out in front at a slight angle and used to fill in the light on our model. The forth light simply bounced straight up from behind. A few adjustments here and there to get the gelled lights to fill in correctly and we made a good number of simple but interesting shots from this corner.

Next we stepped into one of the isles and took advantage of the outside ambient light. We still required a main light as a fill light, but we managed a few 50's biker girl shots. I loved the way the black and white checkered floor created a classic look in these shots. The Black and White version of the images worked great with this setup.


About midway through our shoot we moved over to the counter where a row of chrome high chairs nudged against the shiny front surface of the counter. The background appeared a bit dark so I moved the red gelled light over to the far corner and angled it upward about 45 degrees to create a unique red fill light in a dark area. The blue gelled light was pointed toward the model from the back of the room. This effectively filled the room with a cheerful neon blue cast. The main light with the softbox was placed about 10 feet or so to one side and pointed at Katie and the fourth ambient light simply bounced straight up from a far corner again to provide a little exptra ambient light.

As always, some experimentation was required to get the proper adjustment levels on each light some no one light overwhelmed the composition. The key to good lighting is to make it look natural. These photos turned out rather exciting with the vibration of blue and red colors contrasting with each other, yet it look natural as though a series of neon signs were glowing in the background. We kept the Biker look for a few shots and then had Katie change into her light blue flower dress. When combined with the white lacy hat, her wonderful look was classic 50's. These turned out to be some of the best shots of the day.


Again I tried eye level, mid-level, and ground level shots along with standing on a chair to obtain a high vantage point to look down. What I wanted to capture was a wide-angle skewed look using the checkered floor as a vanishing point that lead toward to main subject.

Before we knew it, our 30 minutes was over and we had to start breaking it down so the good folks who work at the cafe could go home. We had a great time in the short amount of time we were given and much thanks goes to the NCM staff and the Corvette Cafe staff for allowing us to do this shoot. Thanks also to Bill for inspiring the idea and to Katie our model for being a such a good sport. Her genuine and snappy smile really enhanced the finished photos.


The Quick Shoot process I discovered is a great way to obtain spontaneous fresh looks with a portrait model. Being placed into this kind of scenario forces one to work rapidly to set up simple compositions that will retain a nostalgic feel just as though one had simply stepped back in time and captured someone as they might have been.

Tuesday, August 1, 2017

The Quick Shoot - When "Classic" Was Lived (Part 1)

Growing up in the 1950's and 60's created visual snapshots of life adventures from nostalgic events, places, and iconic moments where even today they retain a special place within our memories. Seems like today many photographers are shifting their focus more and more to reproduce images reflective of those years as well as the 1930's and 40's. All for good reason; they were a time when the term Classic was lived.


For the past year and a half or so I've been fortunate to work part time at the National Corvette Museum (NCM), so I am surrounded by restored reminders from those bygone days. One section of the museum is dedicated to Nostalgia where displays are set in period times with the classic cars of those days being the emphasis of the exhibit, and a throw back attempt to recapture those distantly familiar hot rod or car scenes those of us who lived during those times so fondly remember. Also, on the south end of the museum is the Corvette Cafe where one can return to the simplistic days of the old style diner with chrome counters and bold colors to order a good hamburger. It retains the sights and sounds and aromas that at once take us back to those good old vintage days.

When a photographer friend of mine inquired about the possible use of the cafe as a setting for a 1950's model shoot, I jumped at the opportunity to obtain permission to do so. Permission was granted but with some restrictions; we'd have about 30 minutes to do the shoot. That alone makes it difficult as you really do not have much time to experiment, so you gotta know ahead of time what you want to accomplish...thus the idea of the Quick Shoot comes into play.

Actually what happened is that we were granted permission to do two shoots on two separate days; one in
the cafe and one in the Nostalgia section of the NCM. The first shoot was to be in the Nostalgia section during after hours and again we would have about 30 minutes to complete the shoot. A few days before I took a few test shots to get an idea of the angles and how the ambient light worked. This helped to formulate how to position the model well before hand so we could concentrate on shooting and less on setting up the shot.

Our model, the lovely Katie, arrived about 25 minutes before the museum closed and we quickly moved to the Nostalgia section where several classic 1950's era Corvettes were on display in front of a Toy Store and barber shop and in another section, a vintage Mobil Gas station. Lights were set, I used three for the toy store / barber shop shoot and 4 for the Mobil Gas Station shoot.

At the Toy Store / Barber Shop location, one light was set as a backlight and pointed toward the barber shop from the side to provide some extra light on a dark area. Another light was set toward the back in a dark area and pointed toward the model. On it was placed a red gel to provide a splash of color and hint of outline. This effect gave the shot that evening look being set aglow by neon lights. The main light was set in front with a 20 x 30 softbox. I set the red gel backlight on medium power.  My main light with a soft box was set at about 1/2 power, and the third background fill light was set to near full power as it was to broadcast its light across a broad area.


I wanted the shoot to resemble a cross between a PinUp shoot and a Nostalgic shoot with the model performing simple pinup like poses along with the everyday things a 50's era girl might do.


The problem was the angles because there was only a narrow path through which to frame and shoot. I tried eye level, mid level, and ground level looks. I also repositioned the lights to obtain the maximum effect from the gelled backlight. I wanted the lighting to become a subtle part of the story where key accents were used to emphasize the situation. With only 30 minutes or so to shoot, we had to work fast and take chances.

The Mobil Gas Station setting provided a wider array of lighting challenges because not only did I have to light the model, I also needed to light the garage area, the Mobil Pegasus sign, and also provide some red gel light to enhance that night time neon sign look.


Over all in spite of having to work quickly, the effect turned out quite well I believe. Next up will be the Classic 50's Diner shoot...looking forward to it.

Sunday, July 9, 2017

You Know it When it Happens - Photograph with a Purpose

Photographing with a purpose in mind helps you the photographer to focus on the task at hand without getting all caught up in the X's and O's of the game. Many times over the years my photographic efforts have tended to take the approach, well, let's go out and see what happens. Sometimes this works, and sometimes it does not. In recent years I have shifted somewhat away from that approach, mostly, to focus more on creating one single style of image...in other words, I go about it with the intended to purpose to capture a certain type of photograph...a personal vision of sorts.


Photography is about a great deal many things and creating a personal vision ranks very high on the list. Almost every photographer I know develops their own personal style and style in the visual arts is influenced by the personal experiences we all have. In just about everything we do, we can discover analogies that serve to define what we do. For instance one axiom about photography I've learned has a direct connection to all the bass fishing I managed to do over the years. You see, you may find fish-holding structure without bass, but you will never find bass without structure. The same applies to photography. You may experience great light without capturing a great photograph, but you will never capture a great photograph without great light.


Photographing with a purpose does require a shift in the way we go about taking pictures. When photographing people, what I try to do is to continue to take the photo idea further with each photograph. The idea of taking the photo further is something I picked up watching a Joe McNally video a few years ago. He was reviewing and commenting on some photos submitted by individuals. On one particular image he said some good things about it then he said...Don't be afraid to take it further...push it...look for a uniqueness and do not settle when you think you have got it.  


That idea has stayed with me and as I progress photographically, I find myself wanting to do more, wanting to take the image to another level. I try to visualize what my finished product will look like when all the ingredients are there...and when I get there...well, I just know it when it happens...yet I still believe there is always something more I could do.