ESTABLISHED 2010 - Beyond The Campfire was created to encourage readers to explore the great outdoors and to observe it close up. Get out and take a hike, go fishing or canoeing, or simply stretch out on a blanket under a summer sky...and take your camera along. We'll talk about combining outdoor activities with photography. We'll look at everything from improving your understanding of the basics of photography to more advanced techniques including things like how to see photographically and capturing the light. We'll explore the night sky, location shoots, using off camera speedlights along with nature and landscape. Grab your camera...strap on your hiking boots...and join me. I think you will enjoy the adventure.

Tuesday, October 30, 2012

What's Around the Bend

A photograph is a visual story. It has a theme, a plot, dialog, a beginning, a middle, and an end. Sometimes the story is obvious, some times not so obvious, and sometimes the photo is constructed in such a way as to allow the viewer the ability to make their own story. Photo's that use that technique are often some of the most engaging because they pull not only the viewers visual gaze into it, but their emotional desire to find the story. One way to build that kind of photograph is to use the theme...'What's Around the Bend'.

What's around the bend ideas in an image most often use some kind of visual trail that leads the eye into the center of the image and that trail will usually disappear somewhere in the distance. Roads, creeks, trails, tree lines, fence rows are some of the more common elements used as that visual trail. It's important that the trail lead into the image and not out of it...although sometimes leading out of the image can work, it usually works better the other way. Other ways include using such things as the neat rows of a plowed field, or clouds, or even shadows and rolling or receding hills.

I find myself looking for those kinds story lines in photographs quite often and when I discover an opportunity that looks right, I then try to flesh out the story by adding other nuances. Sometimes that requires waiting for the light to change or the conditions or even the season's to change. It's the nuances that add flavor, character, and substance to the story. Without those, well very few around the bend story lines could stand on their own merits.

Here's some examples.  I love windmills...I guess growing up in Oklahoma is what developed that sense of story so whenever I see a windmill, I always take a second and third look to see if there is a story there. This image is a location just a few miles down the road from where I live and I drive by it almost everyday, and almost everyday I take time to see what flavor the story is taking on.


On the morning this photo was taken, there was a light fog that drifted across the farms and fields in the area. I walked a short distance down the old road and lined up this shot being careful to include enough of the road and fence row to lead the eye into the story. You can see the windmill on the right side...kind of hard to see it in such a small version of the image.

One winter's day I came across this next location while out looking for Sandhill Cranes.  The road was slick and there was a good layer of snow covering the landscape. The road curved around and dropped out of sight over the hill and to me at the time it looked like one of those Currier and Ives scenes. I loved the way the road seemed to beacon the viewers eye to follow it around the bend to see what was on the other side and how the fence row carried the view to the turn in the bend just on the edge of the image..


The next image is a favorite of mine as it sings a back road melody like few images do.  It carries in its design that sense of country, that feeling of home is just around the bend, that emotional bond to a familiar place. It says to me, 'welcome home...I've been waiting for you'. It may be one of the best examples of the what's around bend theme I've ever taken.


What's around the bend...it's a great theme for a photographic story line. Take time to look for those opportunities...but not just simply curved roads or fence rows...think about how to flesh out that story...what would your location look like in a different season...on a rainy day...foggy day...early or late light...with shadows. That's how you take the basic theme and turn it into a great story.

Keith

Thursday, October 25, 2012

A Different Perspective


I love fall...with its cooler temps...blustery winds...and all the colors. In Kentucky it seems like the fall colors are slow to start and slower to develop, then all of a sudden they explode across the landscape overnight. It's also one of my favorite times of the year to photograph.  Oddly enough, even though the fall is full of color, those colors can often take on a completely different look when observed from a different perspective...Black and White.

The bright reds and yellow will take on a brilliant silvery hue when converted to black and white.  Add a little tone to the image to shift it toward a more brown or slightly yellowed appearance and the image will often take on a magical look.

Many times I will take a photograph simply because I believe it will look great in black and white.  Black and white offers a more pure blend of contrasts...removing all the distractions caused by colors. This blend of contrasts floods the viewer with a sense of shape, form, texture, purpose, strength, and power.

Here's an example of what I'm writing about.  The image below was taken just a few days ago as the fall colors along Trammel Creek reached their peak. It was late afternoon on an overcast day and the surrounding bluffs and recessed nature of the creek protected the surface from any wind that would cause ripples that might distort the reflections. It's a nice, typical fall image.


The next image is the same image converted to black and white. What I like about this one is the graphic nature of the tones and contrasts...yet it retains a splendid natural feel to it...almost mystical as though it materialized from a fanciful story line.


I've heard it said that if an image works in black and white...it will also work in color. Where color photography is an attempt to capture things from a normal 'as things are' appearance...black and white requires a stronger sense of graphic design...a sense of portraying something natural in an unnatural way, yet retain that sense of its purposeful design. It takes a different perspective...a unique way of looking at a scene to be able to capture it in black and white.  Learning to see in black and white will improve your overall photographic seeing.

Try seeing in black in white sometime when out photographing.  Look for those opportunities when shape and form become the main emphasis of your composition...things that enhance the graphic designs found in nature.

Keith

Saturday, October 20, 2012

It Ain't About What You See...It's About What You Feel....so...don't settle for Average


The main difference between Ansel Adams...and most of us...is that he looked at photography from an artistic perspective...he experimented...tried different techniques...he never settled for ordinary...and he understood the capabilities of his camera equipment.


Camera's really are not all that smart. In spite of the sophisticated electronics and the built in auto exposure capabilities, they still only read the light in such a way as to make a best guess calculation and move the exposure to the middle of the scale. If all you are wanting to accomplish is to take snapshots and capture simple pictures with very little artistic merit, then the auto exposure works pretty well.  It's been a great marketing ploy for the camera manufacturers...making it easy to take decent photo's without thinking to hard.

But, when it comes to capturing images with artistic merit...well...now that requires a bit more...let's say... understanding of what the camera is actually doing. I don't have room here to go into a long explanation of all the functions of digital camera's. But, what I'm going to do is give you an example of the difference between what happens when you simply allow the camera to do what it wants to do...and you telling the camera to do what you want it to do.

Most of my photography involves nature and/or landscape photography. As a result, I tend to shoot almost exclusively in Aperture Priority...that is where you select the aperture or f/stop and the camera selects a corresponding shutter speed. Aperture priority allows me to control the depth-of-field which is important in landscape photography. I also use a lot of exposure compensation...you know...that little +/- button usually on the back or maybe the top of your camera...anyway...I rarely shoot in full manual mode.


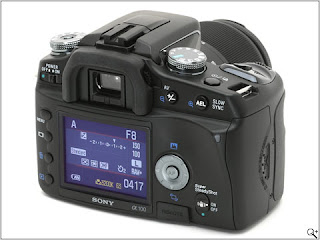
Another aspect of digital cameras is how white balance affects the image, or how well the camera captures color depending on the temperature of the light. (Indoor lighting has a different temperature range than daytime outdoor light). Most digital camera's allow you to change the white balance, but I would guess most people simply use the auto white balance (AWB) setting and just let the camera make that choice for them. White balance can also be adjusted by using the group or symbol settings...like shade, or cloudy, or portrait...these actually help quite a bit and are easy to use.

AWB works pretty well within a set range of light temperatures.  If the light on your subject falls outside that range, then AWB will often shift the color either toward the blueish or reddish side depending on the light temperature situation. Knowing and using this to your advantage can have a huge impact on how your images turn out.


Here's an example.  This first image above was taken simply allowing the camera to do what it wanted to do. It's not a terrible picture...but right away you may notice that it seems to have a rather bluish tint to it.  That's because the light temperature at the time fell well outside the normal range of the AWB capabilities. What I was experiencing visually and emotionally was a deeper, richer lighting situation...So, how then did I manage to capture the next image taken just a few minutes later?


Both images come straight out of the camera...no Photoshop tweaking was done to either of them. The bottom image is a much more powerful image...richer...deeper...more dramatic in its texture and overall effect.  Well, basically there is only one camera setting difference between the two images. Instead of using AWB, or either of the Shade or Cloudy setting on the camera...I switched over to manual White Balance and shifted the setting from it's normal middle of the road 5500 degrees kelvin to 9900 degrees kelvin. That simple shift told the camera to push the color setting from a middle temperature range to a range that more closely matched the color temperature of the sky at the time.  Doing so caused the camera to capture the scene in a much bolder rendition.

The reason I am explaining all this is to re-enforce the idea that photography is not always about capturing exactly what you see.  It's about capturing what you feel. Understanding how the camera reacts to light is one of the first advanced concepts that novice photographers should understand. Doing so gives you a tremendous advantage when it comes telling the camera to do what you want it to do...instead of simply accepting what the camera wants to give you.

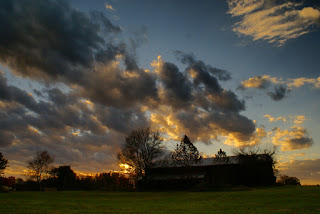
Here's another example.  This next image is one where I basically allowed the camera to do what it wanted to do...I did use a graduated filter to darken the sky some and tweaked the brightness a bit in Photoshop, otherwise it is pretty much the way it looked coming out of the camera and represents the scene very closely to what it actually looked like.


Overall...it's not a bad image with some interesting cloud features. But, looking at it tells me one thing.  I've seen this kind of image a thousand times...I've taken this kind of image a thousand times.  Other than the unique cloud formations there really isn't anything extraordinary about this image. But, remember...photography is not about what you see...it's about what you feel. So...knowing this I wanted to capture the scene in a different way... a way that would generate more drama...more power...more depth and impact. So...I shifted my location to gain a more dramatic composition and...once again...I shifted the WB to manual...and pushed the setting from 5500 to 9900...here is the result.


Same lighting...same basic scene...Big difference.  Which one portrays more drama...which one looks ordinary? Did the scene actually look like this?...not really...but that is the way I wanted it to appear...that is what I was feeling...what I visualized the moment should be and could be.

Understanding that what the camera sees is not necessarily what you see is one of the most difficult concepts for novice photographers to grasp. Understanding this...combined with a solid working knowledge of the mechanics of your camera...can result in creating amazingly bold and powerful images even under rather ordinary circumstances.  It's also important to remember that you don't have to settle for what the camera wants to give you...in most cases what it offers is simply an average...and we as photographers should never settle for average.

Keith